Showing posts with label Download. Show all posts

Sunday, September 25, 2011

How to take screenshots on your Nexus One

Monkey around with your Nexus One long enough, and pretty soon the need to take a screen shot of your device pops up. “No Problem” you think as you head to the app store to download a screenshot app. You then find out that none of the screenshot apps work without rooting your phone, and you’re not ready to do that yet. So what do you do? Taking screenshots on your Nexus One will work, it just requires a bit of elbow grease to set up, but once setup, it’s easy as pie.
Step one in this process is downloading the Android SDK:
For some reason they no longer include the USB driver you need, and they force you to manually update the Android SDK via the command line and download roughly a GB of other files, but since you just want to take screenshots, you don’t need those. Thankfully, I downloaded the SDK before they made you do this, and you can get the USB driver here: Nexus One USB Driver
Now you’ll want to head over and download the Java JDK:
After you click the Download button, it brings you to a page to select what OS you want to download for, click Windows or Windows x64 if you’re rocking a 64bit version of Windows.
Now that you have both development kits downloaded, extract the Android SDK to a folder on your desktop.
.
.
Once thats done (a grueling 5 second process), go ahead and install the Java JDK.
Once the JDK installs, it’s going to open a webpage and ask you to register, you can just close that as it’s not required to register.
Now it’s time to setup your Nexus One to make sure it’s ready to play nice with the software you just installed on your PC:
.
.
  1. Press your Home button
  2. Press your Menu button
  3. Tap Settings
  4. Tap Applications
  5. Tap Development
  6. Tap the box to check USB debugging
.
.
.
.
.
.
Now that your N1 is setup to work nicely with your PC, grab the USB cable that came with your phone and connect your phone to your PC. Windows will try and install the correct drivers for your phone:
And it will eventually it tell you it didn’t work:
But don’t worry, go into your Control Panel and then Device Manager, you should see an unknown device, this is your Nexus One.
.
.
.
.
.
Right click on it and select update driver software. Then select Browse my computer for driver software and point to where you downloaded the N1 USB driver:
Now click Next and make sure you click Install.
You should see something like this:
And you’re ready to go. Head over to your Android SDK folder and get in the tools folder, then double click ddms.bat
Once you do that, a blank CMD window will pop up and just hang there, this is normal. After a few seconds (maybe 10) you will see a new window pop up:
Now click on your phone under where it says Name, and you should now see something like this:
The text that appears in your log will be constantly updating as thats basically what your phone is doing in real time. At this point you’re ready for screenshots! Just press CTRL+S and you’re in business:
At this point, you can save your image as is or copy it and then paste it into your favorite image editor. You can also rotate the image and click refresh to grab an updated screenshot from your phone.
So now whenever you want to grab a screenshot off your N1 you just do the following:
  1. Connect your Nexus One to your PC
  2. Run ddms.bat
  3. Click your phone
  4. Press CTRL+S
  5. Do what you want with your image
It’s really that easy. To bad that getting there is quite the process. However with the help of this guide, I’d like to think that you’ll be up and running and grabbing screenshots in no time.
An original article by Scott Young

Saturday, September 24, 2011

How to Change Your iPhone IMEI with ZiPhone (Windows)

These are step by step instructions how to change your iPhone IMEI easily! You can only do this with a 4.6 BL iPhone.

ZiPhone is capable of the following functions:
- Unlock and Imei changer will work ONLY on 4.6 BL (112 and 113 ootb).
- Jailbreak will work on any OS version.
- Activation will work on any OS version, except for youtube on 1.0.X.

Perform these steps with your iPhone on and connected to your computer.

Step One
Download ZiPhone from: here

Step Two
Double click ZiPhone.zip on your desktop to extract the folder ZiPhone..


Step ThreePress the Windows key and R at the same time to bring up the Run window. Type in cmd and press the Ok button to launch the Command Prompt.
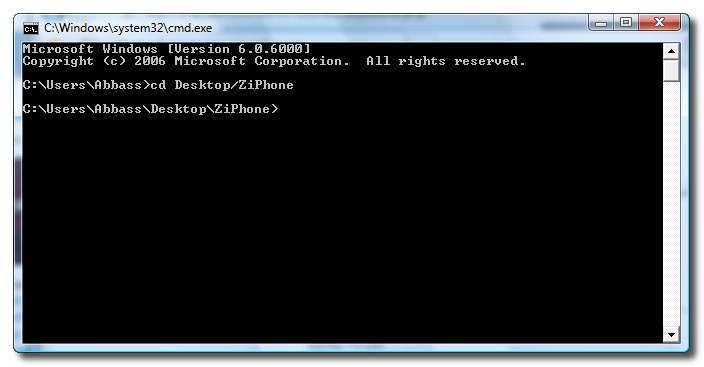
Step FourType the following command into the Command Prompt to navigate to the ZiPhone directory:
cd Desktop/ZiPhone.

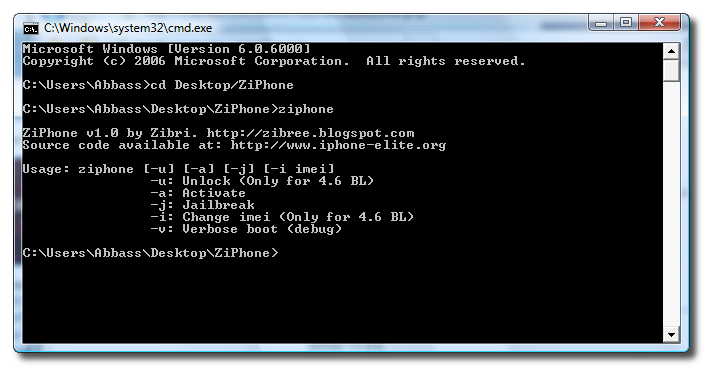
Step FourExecute the command ziphone to see all its possible uses.  
Step FiveThe program will prompt you to put your iPhone into recovery mode. To do this please hold down both the Sleep/Wake and Power buttons until you see the Apple logo. Once the Apple logo appears release only the Sleep/Wake button until you see the iTunes logo and cable on the screen.

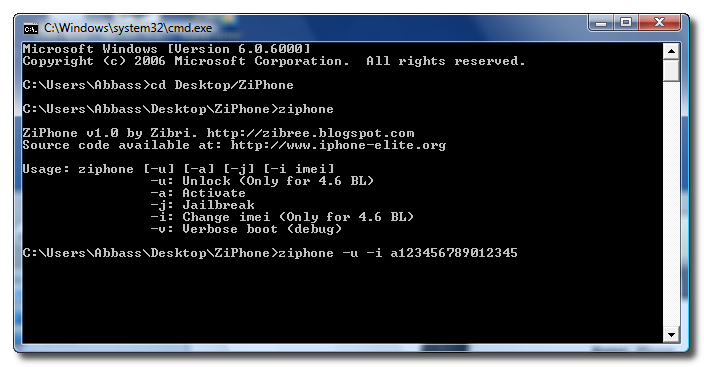
Step SixIf you have a 4.6 BL iPhone you can now activate, jailbreak, and unlock! Just simply type in this command:
ziphone -u -i a123456789012345
(Replace the numbers with the desired IMEI of your choice)

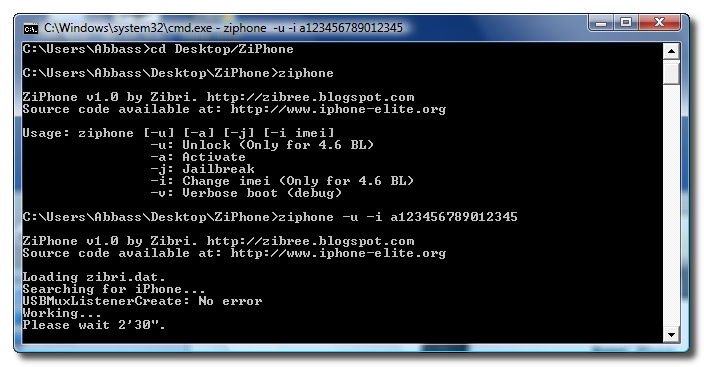
Step SevenThe program will now search for zibri.dat. Then it will search for the iPhone. Once found it will tell you to wait for 2 minutes and 30 seconds. 

Step EightAfter this time your iPhone will reboot and it will be unlocked with the new IMEI!!!


THANKS***: Big thanks go to Zibri
In some country changing a IMEI is illegal. Please check out Your laws before changing IMEI

Wednesday, September 14, 2011

Exploid - Root for X10 mini

Rooting using the Exploid method:
http://android.doshaska.net/x10miniroot

Guide:

This hack http://c-skills.blogspot.com/2010/07...-trickery.html is almost universal.
I've compiled and tested a version for X10 mini.
Download: exploid_x10mini.zip
- download and extract the archive...

You will need ADB from Android SDK and USB drivers for X10 mini (part of Sony Ericsson PC Companion).
Enable USB debugging on the phone in Settings>Applications>Development and connect the phone to PC via USB.
Add the Power Control widget to your active widgets on the phone, so you can quickly turn off and on the wi-fi function.
From the command line (on windows it's cmd.exe):
cd c:\exploid_x10mini (or another folder where you've extracted the files from exploid_x10mini.zip)
adb push Superuser.apk /sdcard/Superuser.apk
adb push su /sdcard/su
adb push exploid /sqlite_stmt_journals/exploid
adb push busybox /sqlite_stmt_journals/busybox
adb shell
cd sqlite_stmt_journals
chmod 755 exploid
chmod 755 busybox
Immediately after the next command, you will need to disable and enable the wi-fi using the power widget on the phone:
./exploid
then run:
rootshell
enter password rootnow
prompt will change to # - now we have root
./busybox cp /sdcard/Superuser.apk /system/app/
./busybox cp /sdcard/su /system/bin/
./busybox cp busybox /system/bin/
chmod 4755 /system/bin/su
rm /system/bin/rootshell
exit - out of rootshell
exit - out of adb shell

Verification:
When you run the abd shell again and issue su command, the Superuser.apk will run on the phone and will ask whether to allow the root permissions...

How To Install A Custom ROM On Your Android


How To Install A Custom ROM On Your Android

Whether you’ve had your Android phone for a long time, or you’ve just bought a new one, there is no moment quite as sweet as when you finally get around to “rooting” that phone. It’s like a “coming of age” for Android users. Not only can you install a whole family of apps that you couldn’t run on an unrooted phone, but you can also install a whole new ROM to your phone.

What’s a ROM you ask? It stands for Read Only Memory, but what it means within the context of an Android phone is that it is essentially the style, theme and organization of the operating system. Thanks to the Android OS being open source, this is possible. There are a huge number of programmers out there working diligently on creating some of the most impressive custom Android ROMs – far better than the stock ROM that comes with your phone.
If you’re just starting out with an unrooted Android, you’ve got some work to do before you can install a new ROM. First, set up the SDK as described in my USB screenshot article. Next click the link above to learn how you can root your phone with SuperOneClick. Finally, you’re ready to take the next big step and replace your ROM.

Installing A Custom Android ROM

If you’re not sure whether you see the point of installing a custom ROM, consider it like you’ve just purchased a new Honda Civic. Now, a Honda Civic is a great car. Better gas mileage and reliability than most other cars in its class, but that doesn’t stop car enthusiasts from making that great car even better by “tuning” it. Well, ROM programmers are essentially Android “tuners”. First things first – safety. When you root your phone and install a new ROM, it should go without saying that you run the risk of turning your phone into an expensive paperweight. The popular approach to installing new ROMs to an Android is by installing the ROM Manager off the Android Market. Once you do – and I can’t stress this enough – choose Flash ClickworkMod Recovery from the menu before you do anything else.

This completely saved me when a couple of ROMs didn’t install correctly. ClockworkMod Recovery lets you make a backup of your current ROM before installing a new one. If you need to, you can reboot into recovery mode (holding down the power button and the “X” key at the same time) to recover your old ROM.
When you’re ready to search for and download a brand new custom ROM for your phone, click on “Download ROM” in the ROM Manager menu.
Now, there are lots of Android users with lots of opinions as to which ROM is best. Favorites seem to be Bugless Beast, Gingerbread and of course CyanogenMod. After a couple of failed attempts with Bugless Beast and Gingerbread, I went with the tried and true CyanogenMod.
When you go to install a ROM, you’ll see the pre-installation pop-up. Always select backup existing ROM. Nine times out of ten you should also wipe data and cache for the installation to work correctly.

 Once the installation was done, my Droid rebooted and when it came back up, I had a fresh installation of CyanogenMod running on my rooted phone. I have to say that I really like the layout, but the default background is definitely a bit “bleh.” So that’s the first thing I changed.

 One of the coolest things about these ROM’s is that you’ve got live wallpaper available. You can’t see it too well below, but my background now has very cool high-tech lights zooming around. Most of the apps shown below came standard with CM.
If static backgrounds are your thing, CM has a pretty decent selection to choose from with some really high-quality artwork. I was impressed – of course I eventually opted for one of the live wallpapers instead.
 When you go into the menu and view the settings, you’ll see that there are a few unique options from the standard ROM. Obviously, CM settings and options, but you’ll also see ADWLauncher available (if you opted for it during download). This is a very cool tool that lets you download and install some amazing themes from the Android market.
Most of these themes aren’t free, but the quality is very good. Ultimately the theme is what creates the “feel” of the interface, which you’ll be dealing with day in and day out, so buying and downloading a theme probably isn’t a waste of money.
Of course, last but not least is the ease with which you can enable or disable your network connections like Wi-Fi, GPS or Bluetooth, straight from the status drop-down. Toggling these networks was always a pet peeve of mine with the standard ROM. With CM it’s just a couple of finger-swipes away.
Whether you choose to go with the popular CyanogenMod, or any one of the other ROMs, just make sure to make a recovery backup of your current ROM so that you’ll have a way out if anything goes wrong. Once that’s aside, you can feel fairly confident installing and test driving the different ROMs available for your device, and you can decide which one is perfect for you.
Did you install a new custom Android ROM? Which one did you choose and what do you like about it? Share your Android insight in the comments section below.

CoreDroidMoD for the HTC Desire S - Custom Rom

CoreDroidMoD for the HTC Desire S

Proudly presenting to you the most attractive ROM with stunning visuals for all HTC Desire S phones!
This ROM is a port of Sergios DesireHD (ACE) ROM whose builds have always been packed with detail in every part! Sergio has been a CHEF on XDA for quite some time, cooked for TP2, still cooking for HD2 and now cooking for the DesireHD and has given me his blessing to port it over to our Desire S.

About CoreDroidMoD

  • Based on the latest official release 1.36.841.3
  • Pre-Rooted
  • RAM Optimisations
  • Speed Optimisations
  • Fast, Stable & Eye Candy
  • System and User Apps Zipaligned
  • Fully De-Odexed
  • Init.d Scripts Support
  • Fully Themed
  • Hosts file updated
  • Adfree app provided for Host Update
  • Added Task Killer tweaks
  • Custom Bootanimation support
  • CRT TV Screen on/off animations
  • Sense 2.1 and Sense 3.0
  • SDCard tune up/Speed Hack
  • Brightness Tweaks
  • Huge Code Cleanup
  • Latest Stock Kernel 2.6.35.10
  • Automatic ZipAlign by Wes Garner
  • MMS options size changed and set as 300K by default (only takes effect with a Wipe install)
  • Build.prop tweaks (gps/3g/edge etc)
  • MarketFixed.
  • and much more!!

Extra 3rd Party Apps On User Data:

  • AddFree
  • HTC Translator Widget
  • Titanium Backup
  • ES File Explorer
  • ClockworkMod
  • SMSBackupRestore

System Apps Moved to User Data for easy update/removal

  • Amazon MP3
  • Google Quick Search Box
  • Adobe Reader
  • Facebook
  • SoundHound
  • Street
  • Twitter
  • Youtube

CoreDroidMoD 5.4 Download Links:

Part 1
Part 2
Part 3

http://www.youtube.com/watch?v=xsFmZpffLH8

CoreDroidMoD 6.6 Download Links:

Part 1
Part 2
Part 3
Part 4

http://www.youtube.com/watch?v=J2IOG-Gz4lQ

You will need to download all parts to extract the ZIP for each ROM

MAKE SURE YOU BACKUP YOUR ROM FIRST AND DO A FULL WIPE BEFORE INSTALLING!
AS THIS IS A COMPLETE RE-WORK YOU WILL NEED TO BACKUP WHAT YOU CAN AND REMEMBER TO DO A FACTORY RESET WITHN CWM RECOVERY:


Also the first boot will take longer than usual, this is normal as the ROM is De-Odexed and the Dalvik Cache needs building.

Hope you enjoy the ROM!!