This is a good way to keep track of how many and where your visitors are from. To get your own just click on the table. You can see by how many visitors have come here that these techniques work.
Friday, October 21, 2011
Where Visitors Are From?
A Visitor Counter

This is a good way to keep track of how many and where your visitors are from. To get your own just click on the table. You can see by how many visitors have come here that these techniques work.
This is a good way to keep track of how many and where your visitors are from. To get your own just click on the table. You can see by how many visitors have come here that these techniques work.
Backlink Builder + Ping
Getting your website indexed in Google, Yahoo and Bing is the first step in improving your web rankings. Once your content is visible in search results you should begin working on your off-site optimization by building quality backlinks. Submitting to directories, article hubs, social bookmarks and statistics sites is easy and free.
Manual url submissions can be very time consuming, especially if you have a full-time job offline. It can take up many hours of your precious time to manually submit to directories, comment on blogs, social bookmark, write articles, link exchange and more. You can easily cut that time in half by using free online web tools that will lessen your work load. Some businesses provide automated services, while others provide semi-automatic services with a little bit of work required on your part.
Submit Your Site
Submit your URL to over 100 highly ranked, authority web properties for fast indexing and easy backlinks. This service is completely free and you will gain quality backward links from whois, dns and statistics websites. Each one will create a new page, with detailed information, linking to your content. Then each new page that was successfully created will be pinged which will allow for fast indexing of your site. This submission can take up to 5 minutes or more depending on your internet connection speed.
NOTE: This tool is great for indexing NEW domain names. If yours is already indexed, you do not need to use this tool. However, you will end up with a few backlinks so the choice is yours.
Enter your URL and title below. Example: http://yoursite.com|Keyword
Indexing of a new domain name can take longer than you might think if you do not create any backlinks to the pages you build. Search engine spiders crawl the internet in search of new websites filled with unique content. While they are crawling, they follow links from domains that are already indexed. The more backlinks the spiders can follow to your content, the easier it is for them to index your website. Many people face indexing problems and need help with getting their pages indexed. This free seo submission tool will get the job done for you.
More sites to submit your site to: Free SEO Backlinks. You can submit your site to 20 SEO analysis sites with a ranking of PR0 - PR5.
Manual directory submission not producing desired results? Try these auto approve web directoriesto lessen your workload a bit.
More sites to submit your site to: Free SEO Backlinks. You can submit your site to 20 SEO analysis sites with a ranking of PR0 - PR5.
Manual directory submission not producing desired results? Try these auto approve web directoriesto lessen your workload a bit.
How to make easy and nice looking webpage with nu?
I just surfed around in internet and found this nice service / tool to make easy homepage just in few minutes. There is lot of advenced options (newsletter, gallery, contact forms, comments, widgets) and lot of tempates (fully editable). And all these made by young swedish guy Jim!
About the Author Jim Westergren is a web entrepreneur from Sweden who lives together with his wife and son. Some of his interests are programming, web development, SEO, writing and taking photos. His current major project is N.nu. Read his full about page.
Follow Jim on Twitter or subscribe to this blog. In Swedish: presentation, blog.
About the Author
Jim Westergren is a web entrepreneur from Sweden who lives together with his wife and son. Some of his interests are programming, web development, SEO, writing and taking photos. His current major project is N.nu. Read his full about page.Follow Jim on Twitter or subscribe to this blog. In Swedish: presentation, blog.
Thursday, October 20, 2011
How to take screenshots on your Nexus One

Monkey around with your Nexus One long enough, and pretty soon the need to take a screen shot of your device pops up. “No Problem” you think as you head to the app store to download a screenshot app. You then find out that none of the screenshot apps work without rooting your phone, and you’re not ready to do that yet. So what do you do? Taking screenshots on your Nexus One will work, it just requires a bit of elbow grease to set up, but once setup, it’s easy as pie.
Step one in this process is downloading the Android SDK:

For some reason they no longer include the USB driver you need, and they force you to manually update the Android SDK via the command line and download roughly a GB of other files, but since you just want to take screenshots, you don’t need those. Thankfully, I downloaded the SDK before they made you do this, and you can get the USB driver here:Nexus One USB Driver
Now you’ll want to head over and download the Java JDK:

After you click the Download button, it brings you to a page to select what OS you want to download for, click Windows or Windows x64 if you’re rocking a 64bit version of Windows.
 Now that you have both development kits downloaded, extract the Android SDK to a folder on your desktop.
.
.
Once thats done (a grueling 5 second process), go ahead and install the Java JDK.

Once the JDK installs, it’s going to open a webpage and ask you to register, you can just close that as it’s not required to register.
Now it’s time to setup your Nexus One to make sure it’s ready to play nice with the software you just installed on your PC:

.
.
- Press your Home button
- Press your Menu button
- Tap Settings
- Tap Applications
- Tap Development
- Tap the box to check USB debugging
.
.
.
.
.
Now that your N1 is setup to work nicely with your PC, grab the USB cable that came with your phone and connect your phone to your PC. Windows will try and install the correct drivers for your phone:

And it will eventually it tell you it didn’t work:

 But don’t worry, go into your Control Panel and then Device Manager, you should see an unknown device, this is your Nexus One.
.
.
.
.
Right click on it and select update driver software. Then select Browse my computer for driver software and point to where you downloaded the N1 USB driver:

Now click Next and make sure you click Install.

You should see something like this:

And you’re ready to go. Head over to your Android SDK folder and get in the tools folder, then double click ddms.bat

Once you do that, a blank CMD window will pop up and just hang there, this is normal. After a few seconds (maybe 10) you will see a new window pop up:

Now click on your phone under where it says Name, and you should now see something like this:

The text that appears in your log will be constantly updating as thats basically what your phone is doing in real time. At this point you’re ready for screenshots! Just press CTRL+S and you’re in business:

At this point, you can save your image as is or copy it and then paste it into your favorite image editor. You can also rotate the image and click refresh to grab an updated screenshot from your phone.
So now whenever you want to grab a screenshot off your N1 you just do the following:- Connect your Nexus One to your PC
- Run ddms.bat
- Click your phone
- Press CTRL+S
- Do what you want with your image
An original article by Scott Young
Does your Android device lack a notification light? Try the NoLed app

With all the advancements in mobile technology it still comes as a huge surprise when a smartphone manufacturer neglects to add a notification light to their device. There are not a whole bunch of phones that are plagued with this dilema but for the ones that are, it’s known to be a pain in the arse.
For some reason Samsung has decided to crank out a few popular mobile devices and at my dismay, they are sans notification LED. I , like many others, own a Samsung device and hate not knowing that I have a message waiting for me unless I activate the screen and check for myself. Sounds like an easy task but when you find yourself checking for messages all day long it gets old real fast.
XDA member, MADMACK, has come up with a solution by using the phone’s display as a notification light. When you receive a message (or anything that you want a notification for) your screen will activate flashing different color dots or icons based on the type of message received. The dots/icons are customizable allowing the user to create different notifications for each type of reminder making it easy, for example, to differentiate between email and text messages. There are many ways to tweak this app from battery conservation to delayed notification, NoLed gives more options than most factory notification lights.
With over 10,000 downloads from the Android Market and an average rating of 4.4 stars, MADMACK seems to have come up with an acceptable solution for not having a notification light. I have been using it since I got the Samsung Charge and I highly recommend checking it out for yourself.
Join us after the break for more screenshots, download links, and a NoLed explanation from the creator himself.


The application does the following:You can download NoLed from the Android Market . Wether you love it or hate it, be sure to let us know what you think!
1. When your phone receives a notification, it switches the screen on and displays a notification. The notification bounces around every 3 seconds (changeable via an option). This will guarantee using different LEDs so that the same ones won’t be burned out.
2. You can customize whether to have a dot or an icon for each type of supported notification. Users may also customize the colors of these icons/dots.
3. NoLED will work with SMS/MMS, Gtalk, Gmail, Missed calls, Voicemail, Calendar and K-9 (email client) without any additional permissions. Any other 3rd party software (e.g. Whatsapp, Email app, Yahoo Mail and Hotmail) will need to be checked under Monitored Apps and will require granting Accessibility rights to NoLED.
4. The app runs as a service, after installing, you have two ways to activate the app. (a) by restarting. (b) by loading the widget into your home screen and clicking on it.
5. To get rid of the notification screen, you may use the home or the back key. You can enable dismissal via more keys in the Miscellaneous submenu. Once your notifications are dismissed, all notifications disappear and will not come back up.
HTC Amaze 4G gains permanent one-click-root [Courtesy of XDA]
Well looky here! The great developers over at XDA have mustered up a simple way to fully root to the new HTC Amaze 4G. Talk about fast! Until today they only had temporary root, but now you can use an easy one-click-root method to permanently root your new Amaze 4G.

You must keep in mind that your bootloader must be unlocked or this new method below will just be another temporary root. Your bootlader must be fully unlocked to achieve permanent root. The Amaze 4G is not yet listed on the HTCdev.com site for unlocking bootloaders, but that method will still work for the device. Once unlocked, head to the HTC Amaze 4G XDA thread to gain permanent root, woot! It’s only a matter of time before custom roms and recovery tools are available as well.
I am sure you know this, but this WILL void your factory warranty and TakAndroid will not be held responsible, this post is for your reference only. Once you obtain the HTC drivers and the root method, you’re all set. It’s only a matter of time before custom roms and recovery tools are available as well. Jump past the break for full instructions from XDA.
Instructions:
-Download HTC USB drivers here
-Download one-click root here
-Download files above
-Extract to C:\
-Navigate into Zerg rush folder
-Click ZergRushTempRoot.bat
-Wait like 3 min
-Reboot
-Enjoy PermRooted Amaze 4G
[via XDA]
iMac | What Type of RAM (Memory) to Use for Your iMac
To determine what kind of RAM (memory) is needed for your iMac select the model you have from the list below.
iMac G3 (233, 266, 333 MHz)
iMac G3 (350, 400, 500, 600 MHz)
iMac G4 (700, 800 MHz)
iMac G4 (1.00, 1.25 GHz)
iMac G5 (1.60, 1.80 GHz)
iMac G5 (1.9, 2.1 GHz)
iMac Intel Core Duo
iMac Intel Core 2 Duo (1.83 GHz)
iMac Intel Core 2 Duo (Late 2006)
iMac Intel Core 2 Duo (Mid 2007)
iMac Intel Core 2 Duo (Early 2008)
iMac Intel Core 2 Duo (Early 2009)
iMac G3 (233, 266, 333 MHz)
Maximum Memory: 512 MB
Memory Type: 144-pin SODIMM SDRAM PC-133 [buy ]
]
Memory Slots: 2
Slot Maximum: 256 MB
iMac G3 (350, 400, 500, 600 MHz)
Maximum Memory: 1 GB
Memory Type: 168-pin DIMM SDRAM PC-133 [buy]
Memory Slots: 2
Slot Maximum: 512 MB
iMac G4 (700, 800 MHz)
Maximum Memory: 1 GB
Memory Type: 144-pin SODIMM SDRAM PC-133 [buy]
Memory Slots: 2
Slot Maximum: 512 MB
iMac G4 (1.00, 1.25 GHz)
Maximum Memory: 1 GB
Memory Type: 200-pin SODIMM DDR PC-2700 [buy]
Memory Slots: 1 (*Has DIMM slot that is not accessible)
Slot Maximum: 512 MB
iMac G5 (1.60, 1.80 GHz)
Maximum Memory: 2 GB
Memory Type: 184-pin DIMM DDR PC-3200 [buy]
Memory Slots: 2
Slot Maximum: 1 GB (Best to use pairs)
iMac G5 (1.9, 2.1 GHz)
Maximum Memory: 2.5 GB
Memory Type: 240-pin DIMM DDR2 PC2-5300 [buy]
Memory Slots: 1 (512 MB not removable)
Slot Maximum: 2 GB
iMac Intel Core Duo
Maximum Memory: 2 GB
Memory Type: 200-pin SODIMM DDR2 PC2-5300 [buy]
Memory Slots: 2
Slot Maximum: 1 GB
iMac Intel Core 2 Duo (1.83 GHz)
Maximum Memory: 2 GB
Memory Type: 200-pin SODIMM DDR2 PC2-5300 [buy]
Memory Slots: 2
Slot Maximum: 1 GB
iMac Intel Core 2 Duo (Late 2006)
Maximum Memory: 3 GB
Memory Type: 200-pin SODIMM DDR2 PC2-5300 [buy]
Memory Slots: 2
Slot Maximum: 2 GB
iMac Intel Core 2 Duo (Mid 2007)
Maximum Memory: 4 GB
Memory Type: 200-pin SODIMM DDR2 PC2-5300 [buy]
Memory Slots: 2
Slot Maximum: 2 GB
iMac Intel Core 2 Duo (Early 2008)
Maximum Memory: 4 GB
Memory Type: 200-pin SODIMM DDR2 PC2-6400 [buy]
Memory Slots: 2
Slot Maximum: 2 GB
iMac Intel Core 2 Duo (Early 2009)
Maximum Memory: 8 GB
Memory Type: 204-pin SODIMM DDR3 PC3-8500 [buy]
Memory Slots: 2
Slot Maximum: 4 GB

iMac G3 (233, 266, 333 MHz)
iMac G3 (350, 400, 500, 600 MHz)
iMac G4 (700, 800 MHz)
iMac G4 (1.00, 1.25 GHz)
iMac G5 (1.60, 1.80 GHz)
iMac G5 (1.9, 2.1 GHz)
iMac Intel Core Duo
iMac Intel Core 2 Duo (1.83 GHz)
iMac Intel Core 2 Duo (Late 2006)
iMac Intel Core 2 Duo (Mid 2007)
iMac Intel Core 2 Duo (Early 2008)
iMac Intel Core 2 Duo (Early 2009)
iMac G3 (233, 266, 333 MHz)
Maximum Memory: 512 MB
Memory Type: 144-pin SODIMM SDRAM PC-133 [buy
Memory Slots: 2
Slot Maximum: 256 MB
iMac G3 (350, 400, 500, 600 MHz)
Maximum Memory: 1 GB
Memory Type: 168-pin DIMM SDRAM PC-133 [buy
Memory Slots: 2
Slot Maximum: 512 MB
iMac G4 (700, 800 MHz)
Maximum Memory: 1 GB
Memory Type: 144-pin SODIMM SDRAM PC-133 [buy
Memory Slots: 2
Slot Maximum: 512 MB
iMac G4 (1.00, 1.25 GHz)
Maximum Memory: 1 GB
Memory Type: 200-pin SODIMM DDR PC-2700 [buy
Memory Slots: 1 (*Has DIMM slot that is not accessible)
Slot Maximum: 512 MB
iMac G5 (1.60, 1.80 GHz)
Maximum Memory: 2 GB
Memory Type: 184-pin DIMM DDR PC-3200 [buy
Memory Slots: 2
Slot Maximum: 1 GB (Best to use pairs)
iMac G5 (1.9, 2.1 GHz)
Maximum Memory: 2.5 GB
Memory Type: 240-pin DIMM DDR2 PC2-5300 [buy
Memory Slots: 1 (512 MB not removable)
Slot Maximum: 2 GB
iMac Intel Core Duo
Maximum Memory: 2 GB
Memory Type: 200-pin SODIMM DDR2 PC2-5300 [buy
Memory Slots: 2
Slot Maximum: 1 GB
iMac Intel Core 2 Duo (1.83 GHz)
Maximum Memory: 2 GB
Memory Type: 200-pin SODIMM DDR2 PC2-5300 [buy
Memory Slots: 2
Slot Maximum: 1 GB
iMac Intel Core 2 Duo (Late 2006)
Maximum Memory: 3 GB
Memory Type: 200-pin SODIMM DDR2 PC2-5300 [buy
Memory Slots: 2
Slot Maximum: 2 GB
iMac Intel Core 2 Duo (Mid 2007)
Maximum Memory: 4 GB
Memory Type: 200-pin SODIMM DDR2 PC2-5300 [buy
Memory Slots: 2
Slot Maximum: 2 GB
iMac Intel Core 2 Duo (Early 2008)
Maximum Memory: 4 GB
Memory Type: 200-pin SODIMM DDR2 PC2-6400 [buy
Memory Slots: 2
Slot Maximum: 2 GB
iMac Intel Core 2 Duo (Early 2009)
Maximum Memory: 8 GB
Memory Type: 204-pin SODIMM DDR3 PC3-8500 [buy
Memory Slots: 2
Slot Maximum: 4 GB
AppleTV | How to Install Plex Media Center on Your Apple TV
These are instructions on how to install Plex Media Center on your Apple TV. Before beginning you must jailbreak your device.
Step One
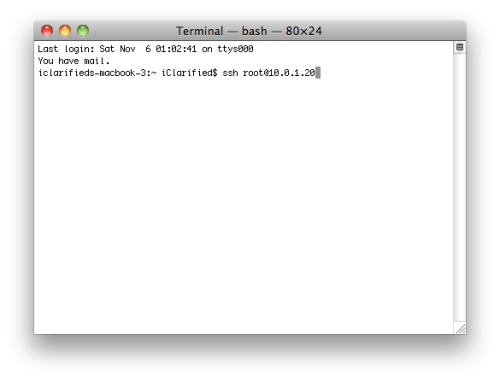
Launch Terminal from your Applications:Utilities folder.

Step Two
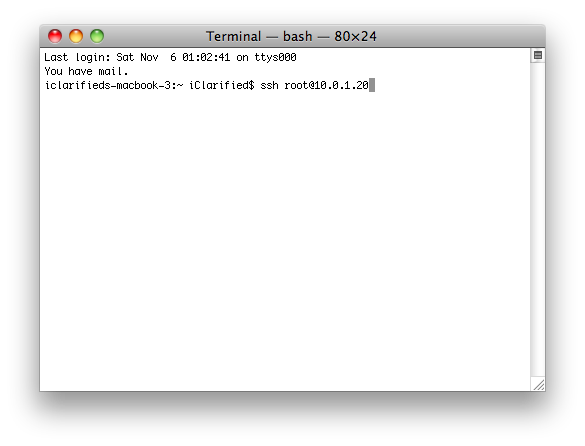
SSH into the Apple TV by entering the following command into the Terminal window. Replace "10.0.1.20" with the IP address of your Apple TV.
ssh root@10.0.1.20
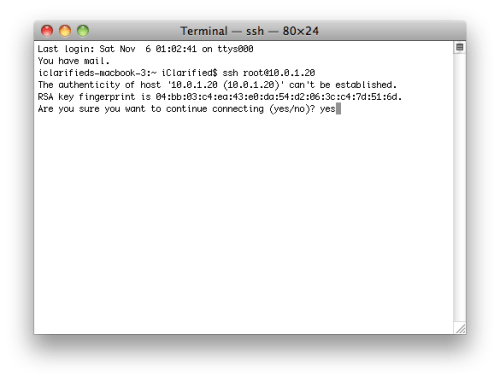
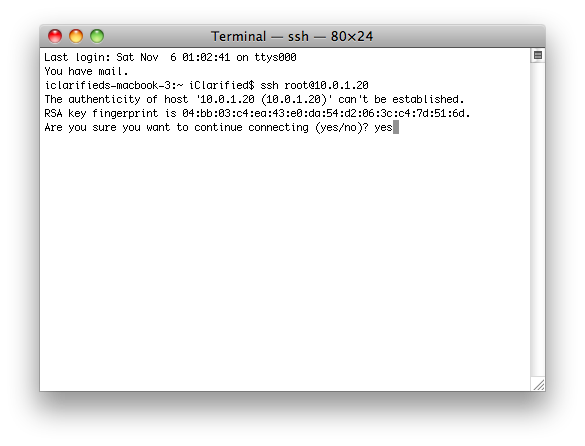
If you haven't connected to this device before it will ask you if you're sure you want to continue connecting. Type in yes and hit the enter key.
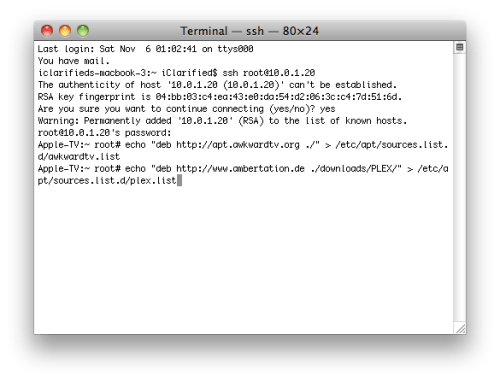
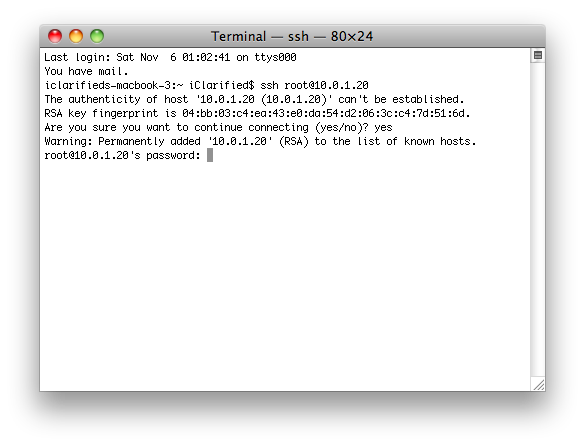
Enter alpine as your password if you haven't already changed it.

Step Three
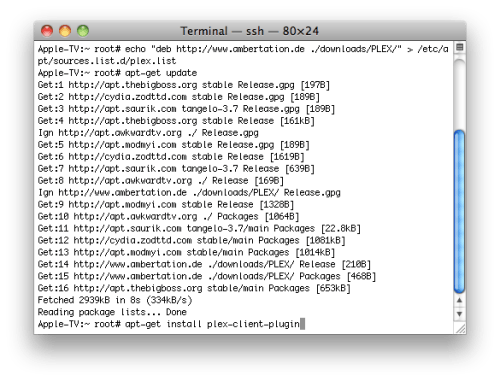
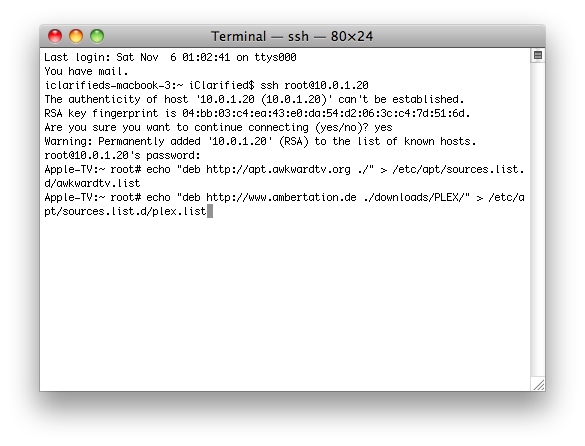
Add the new Cydia sources by inputing the following commands into the Terminal window.
echo "deb http://apt.awkwardtv.org ./" > /etc/apt/sources.list.d/awkwardtv.list
echo "deb http://www.ambertation.de ./downloads/PLEX/" > /etc/apt/sources.list.d/plex.list
Step Four
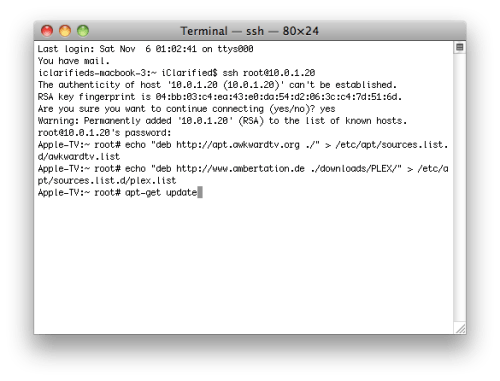
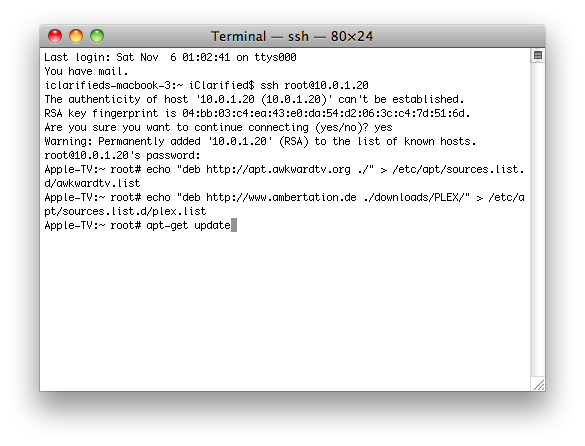
Now update your Cydia database by entering the following command.
apt-get update
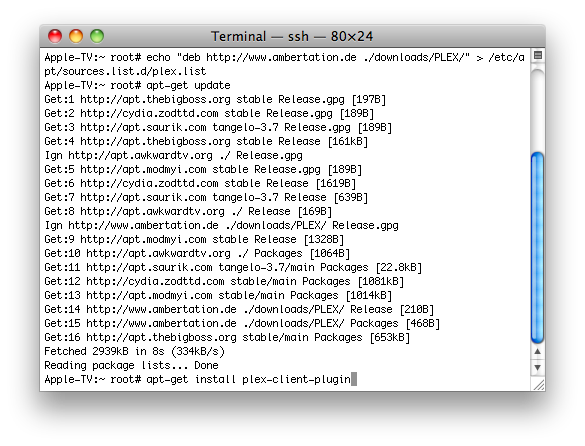
Step Five
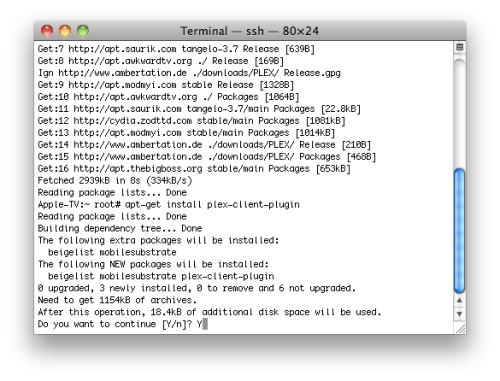
Install the plugins (and its dependencies like beigelist by DHowett) by entering the following command.
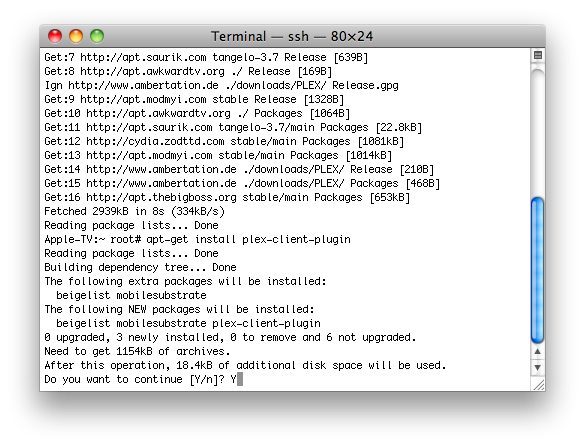
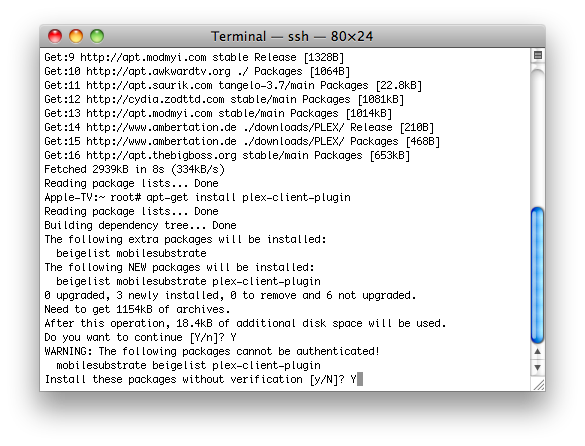
apt-get install plex-client-plugin
If you are warned that additional disk space will be used, input Y and press enter
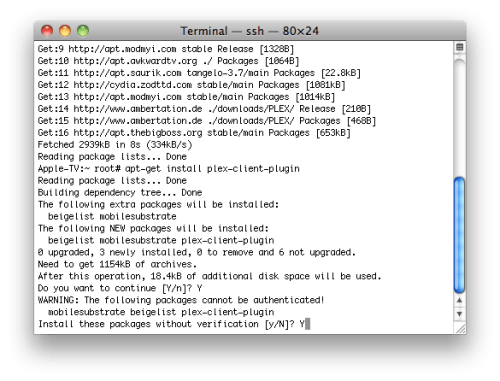
If asked to Install these packages without verification, input Y and press enter.
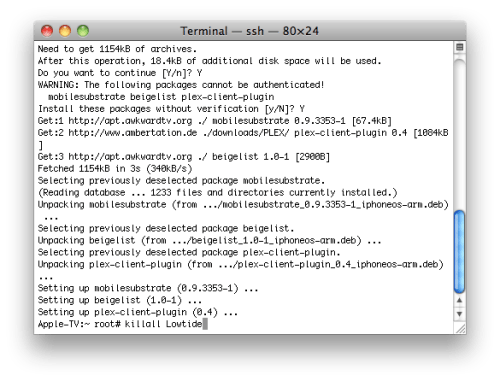
Step Six
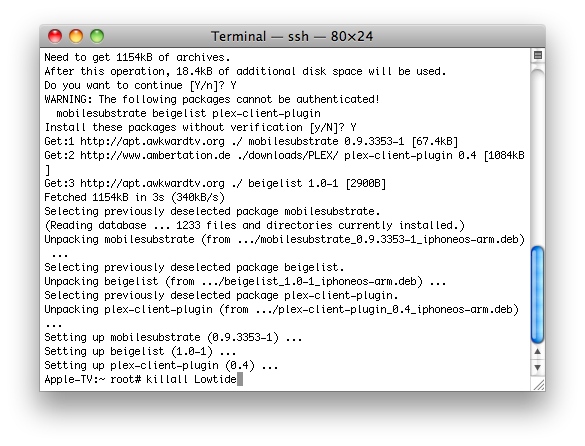
Restart the GUI by entering the following command into the Terminal window.
killall Lowtide
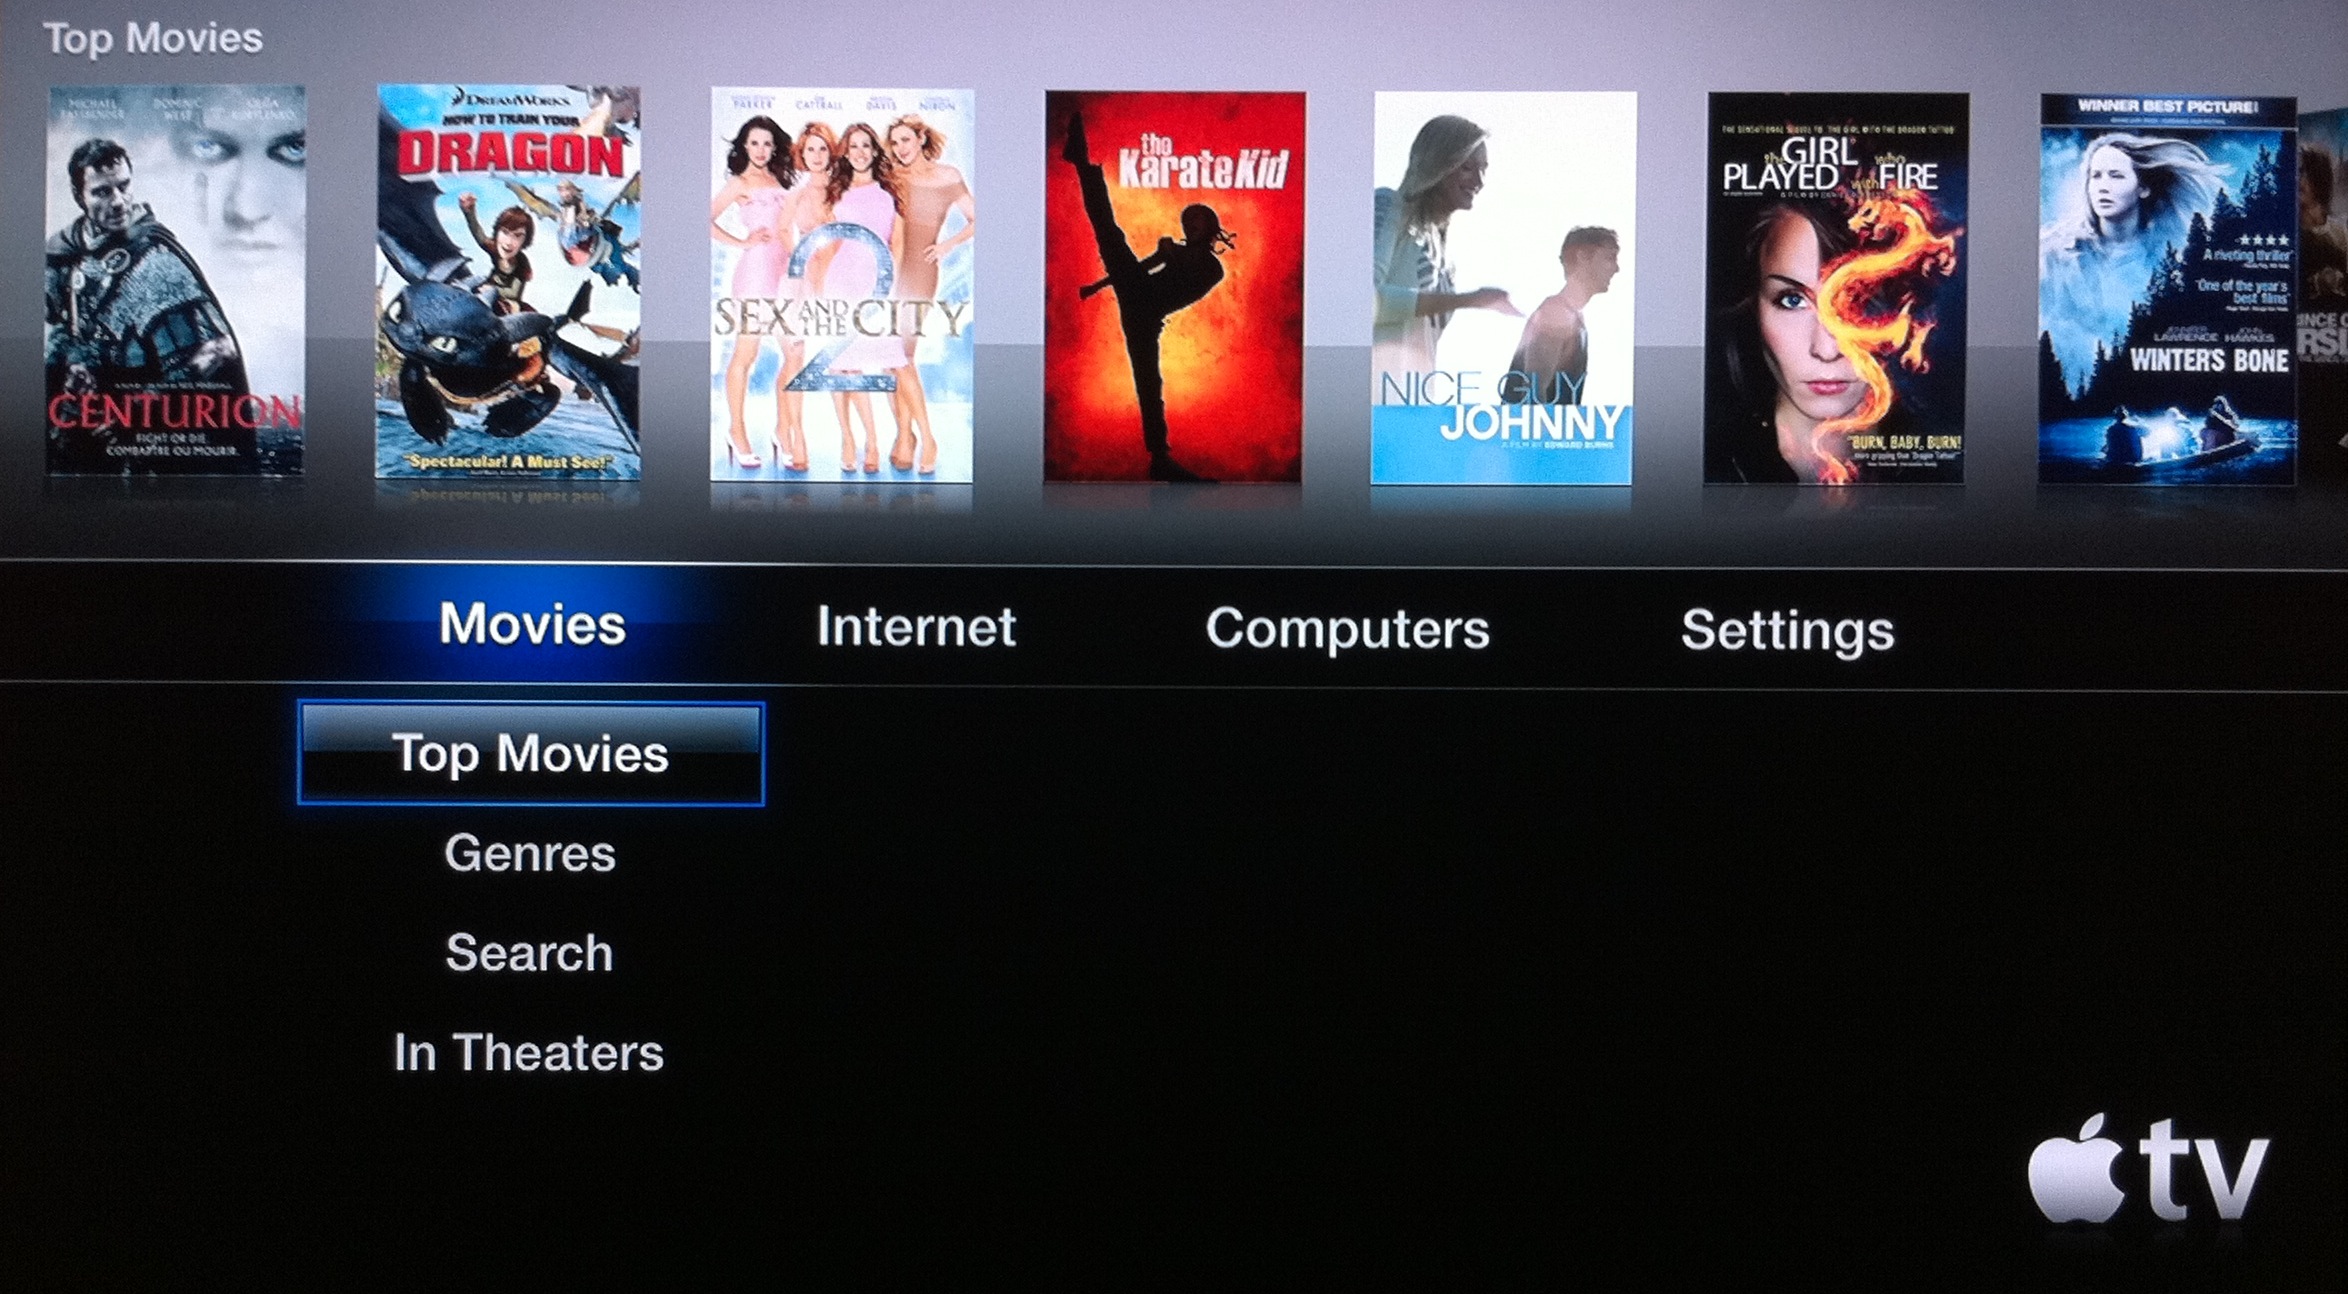
Step Seven
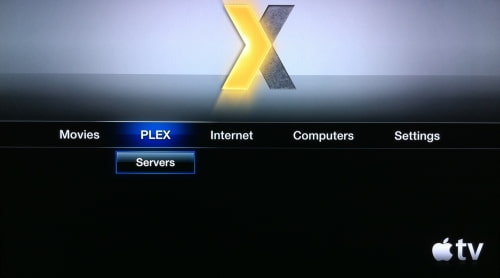
Once the GUI restarts you should see PLEX in the menu bar.

You can learn more about these instructions from their source.
Step One
Launch Terminal from your Applications:Utilities folder.
Step Two
SSH into the Apple TV by entering the following command into the Terminal window. Replace "10.0.1.20" with the IP address of your Apple TV.
ssh root@10.0.1.20
If you haven't connected to this device before it will ask you if you're sure you want to continue connecting. Type in yes and hit the enter key.
Enter alpine as your password if you haven't already changed it.
Step Three
Add the new Cydia sources by inputing the following commands into the Terminal window.
echo "deb http://apt.awkwardtv.org ./" > /etc/apt/sources.list.d/awkwardtv.list
echo "deb http://www.ambertation.de ./downloads/PLEX/" > /etc/apt/sources.list.d/plex.list
Step Four
Now update your Cydia database by entering the following command.
apt-get update
Step Five
Install the plugins (and its dependencies like beigelist by DHowett) by entering the following command.
apt-get install plex-client-plugin
If you are warned that additional disk space will be used, input Y and press enter
If asked to Install these packages without verification, input Y and press enter.
Step Six
Restart the GUI by entering the following command into the Terminal window.
killall Lowtide
Step Seven
Once the GUI restarts you should see PLEX in the menu bar.

You can learn more about these instructions from their source.
Bootcamp | How to Install Windows 7 on Your Mac Using Boot Camp
These are instructions on how to install Windows 7 (32 bit or 64 bit) on your Mac using Boot Camp.
Before you begin this tutorial you will need the following:
- Windows 7 Installation DVD
- Mac OS X Installation DVD or Boot Camp 2.1 on CD/DVD
Step One
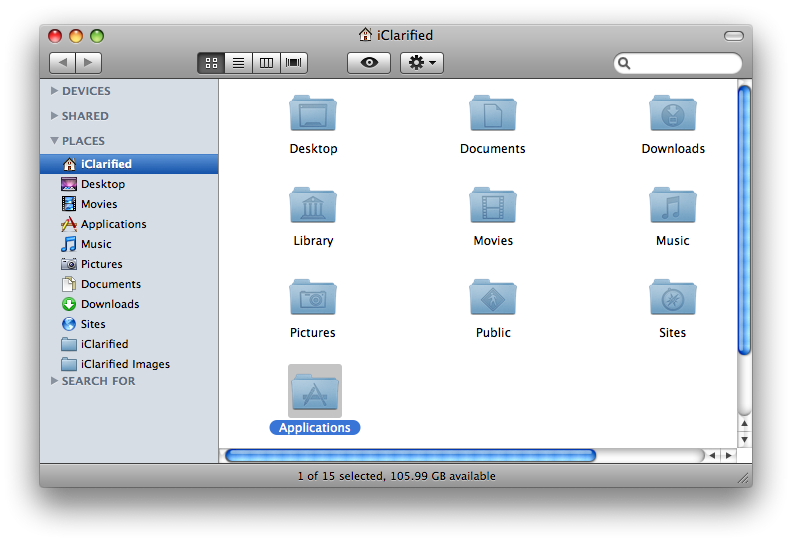
Open a new Finder window by clicking the Finder icon in your dock.

Step Two
Click Applications from the list of places on the left.

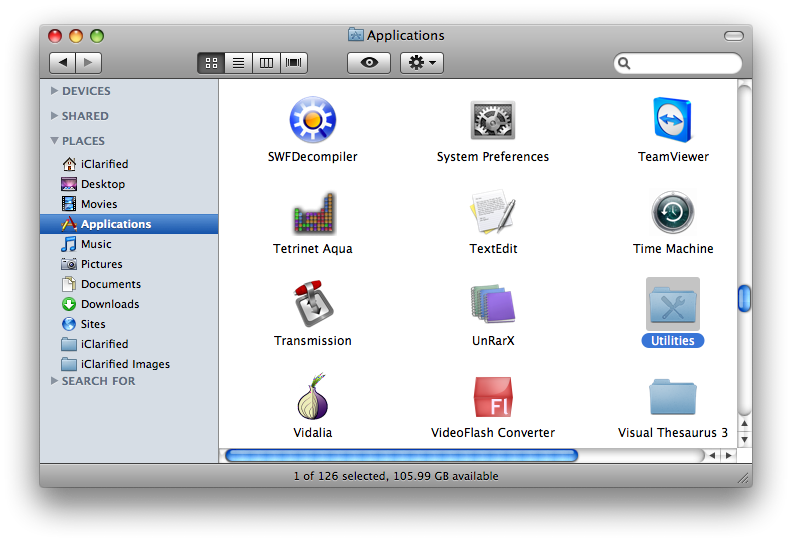
Step Three
Double click the Utilities folder to access your utility applications.

Step Four
Double click the Boot Camp icon to launch the application.

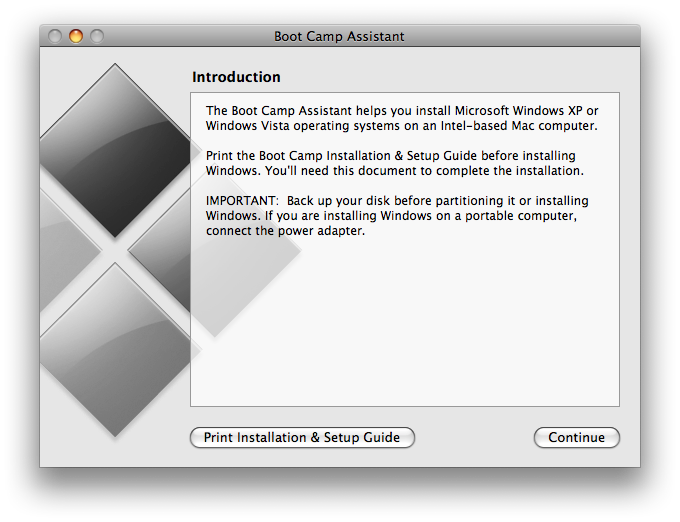
Step Five
The Boot Camp Assistant will open. Click the Continue button.

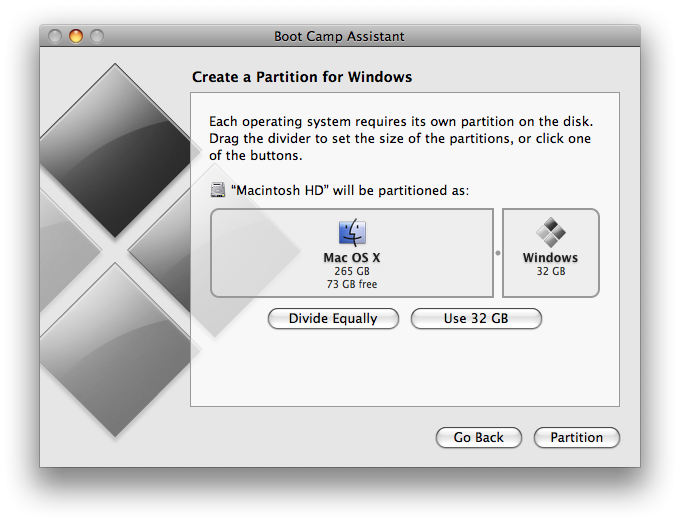
Step Six
You will now be asked to Create a Partition for Windows. You can drag the divider to set the size of the partitions. Windows 7 needs about 10 GB at very minimum. If you plan to install applications make sure you allow extra space for them. I clicked the Use 32 GB button to assign 32 GB to my Windows 7 partition. When satisfied with the size of your partition click the Partition button.

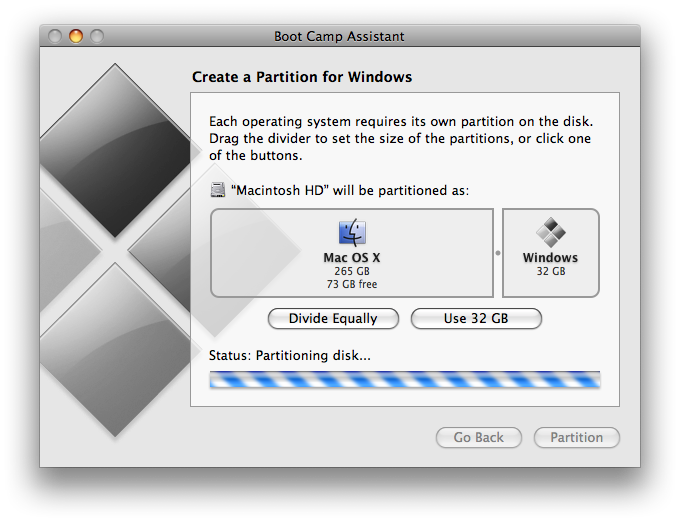
Boot Camp will now partition your hard disk...

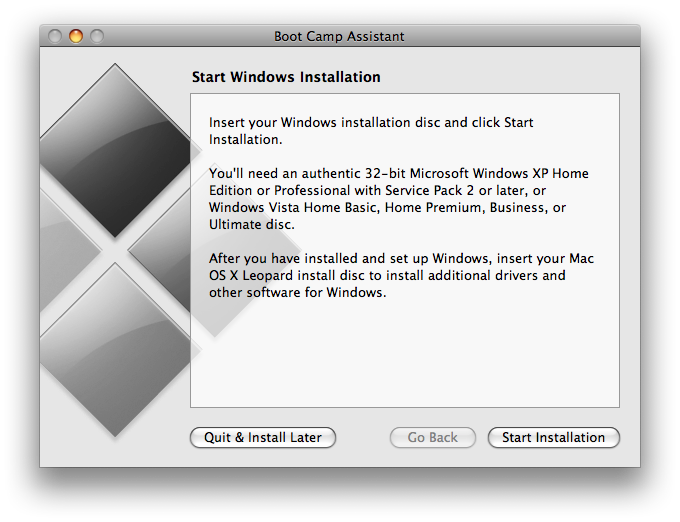
Step Seven
Once your disk has been partitioned you are ready to start the Windows installation. Insert your Windows 7 Installation DVD and click the Start Installation button.

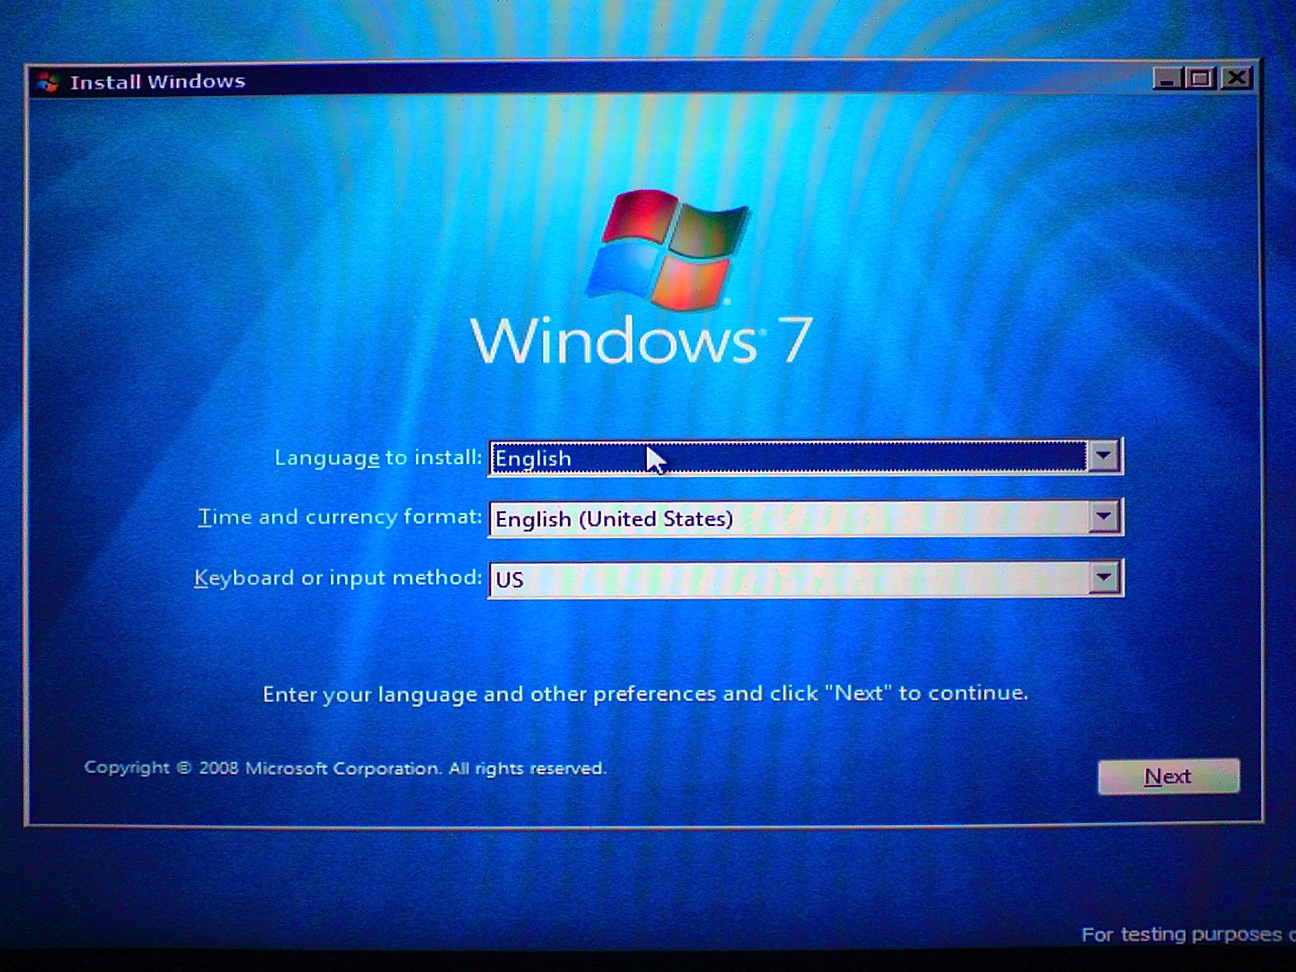
Step Eight
Your computer will now reboot and launch the Windows 7 Setup. Select your language, Time and currency format, and Keyboard or input method from the dropdown boxes, then click the Next button.

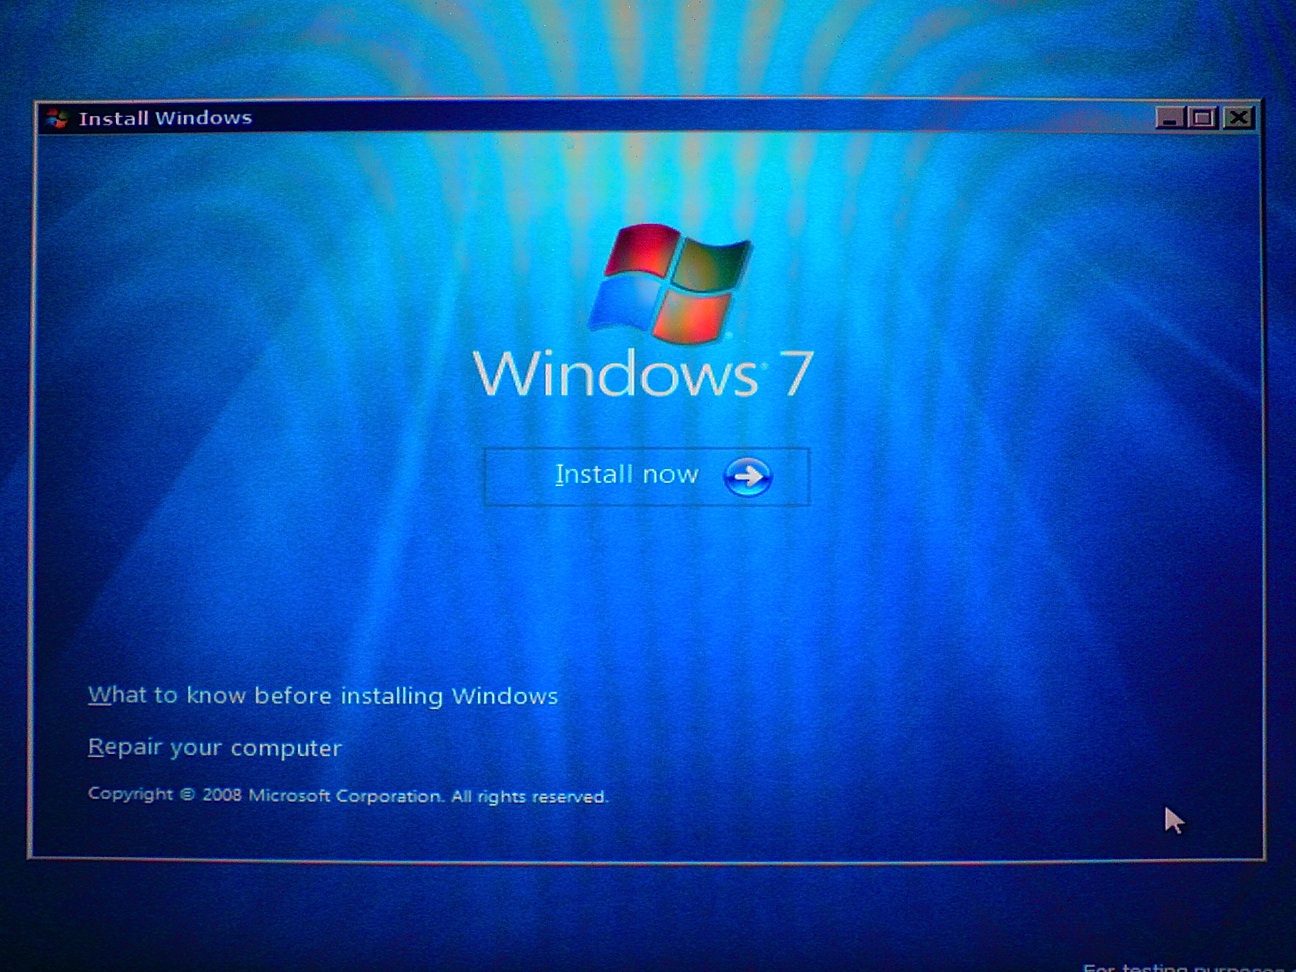
Step Nine
Click the Install now button.

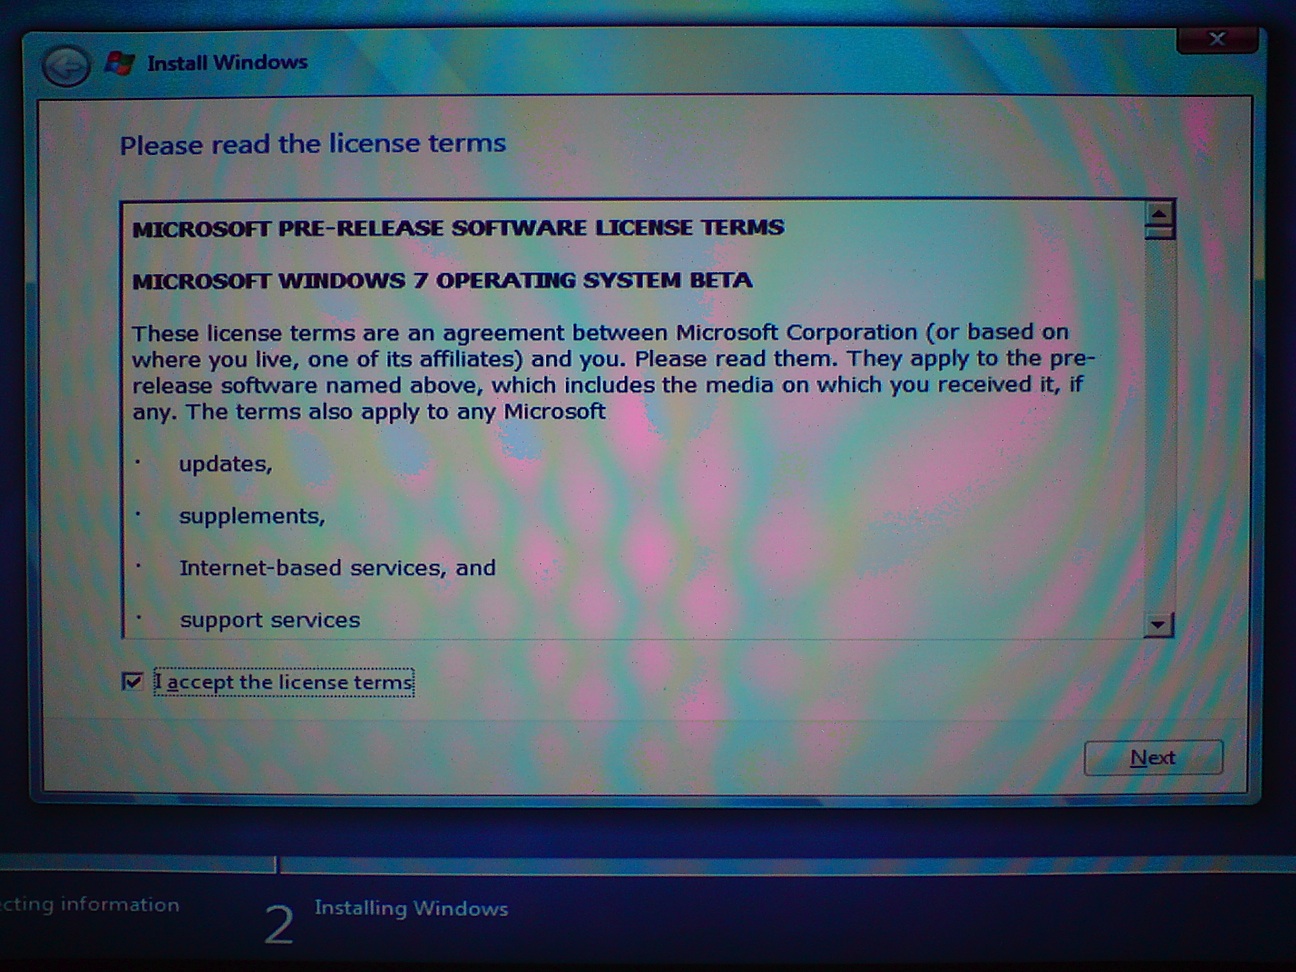
Step Ten
Please read the license terms then check the box to accept the license terms. Click the Next button to continue.

Step Eleven
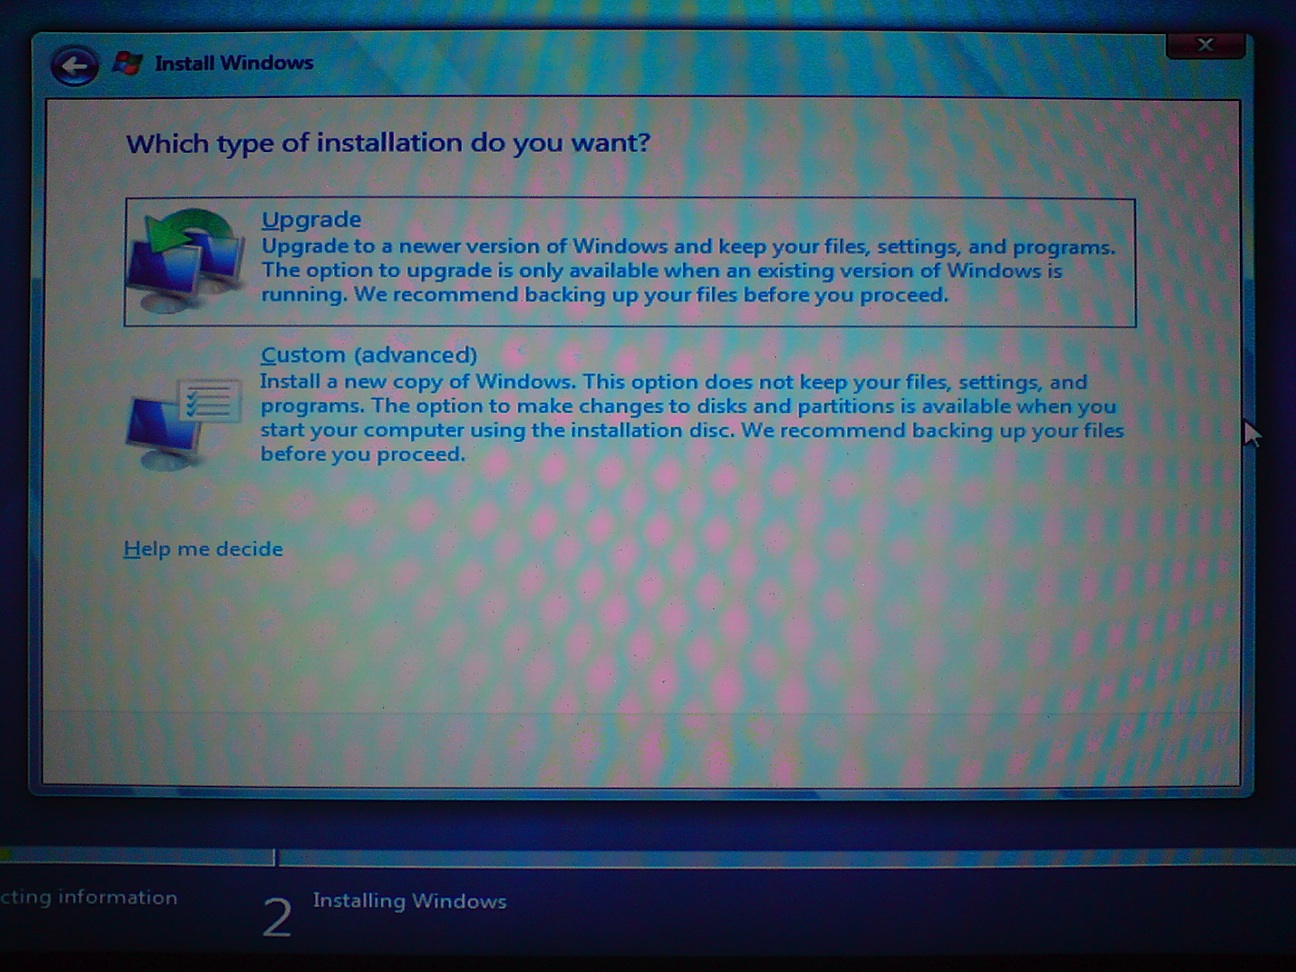
Click to select the Custom (advanced) method of installation.

Step Twelve
Click to select the Disk Partition labeled BOOTCAMP then click the Drive options (advanced) link below.

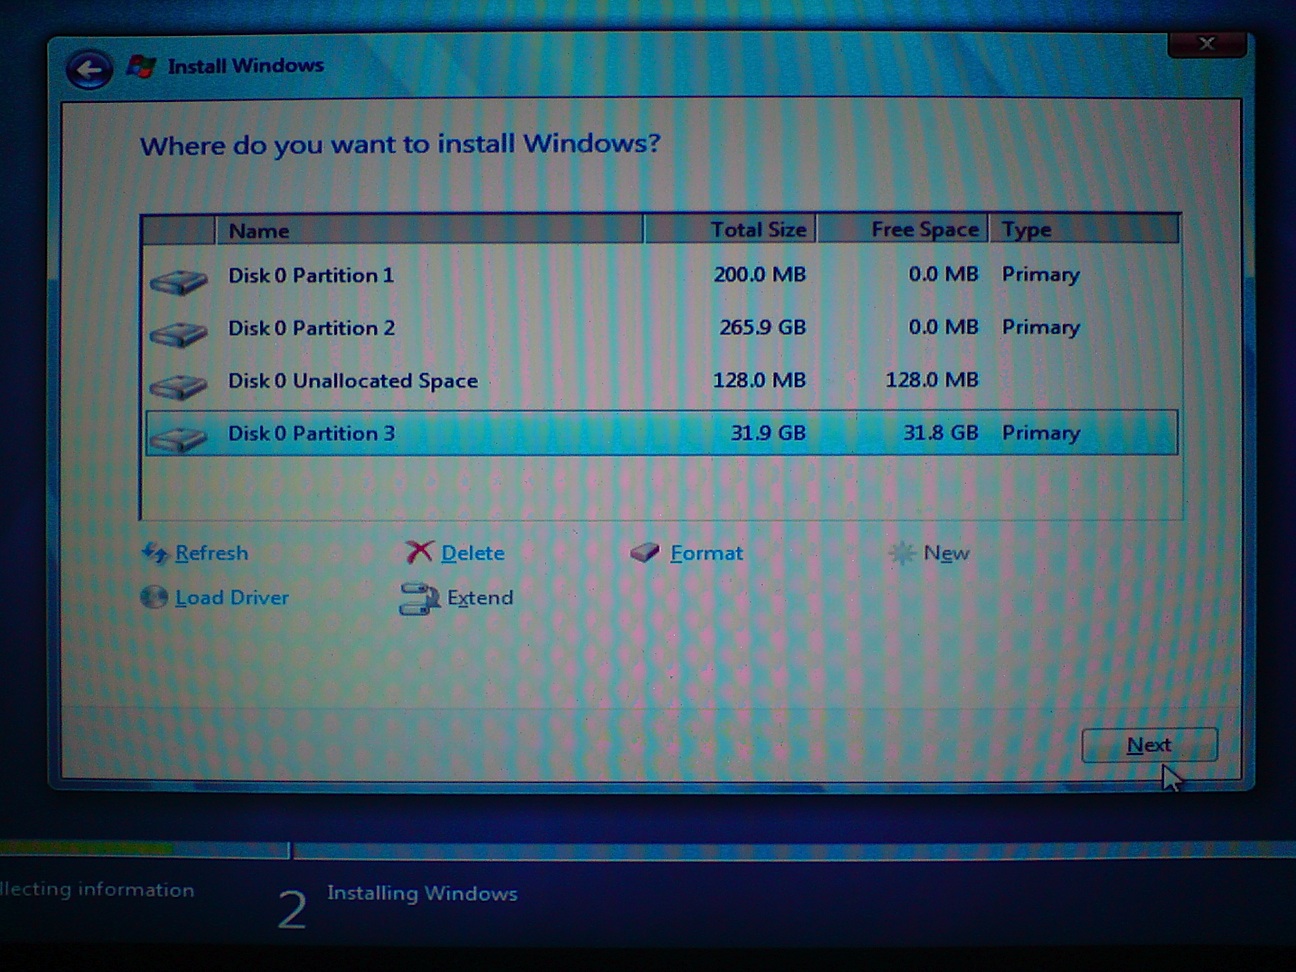
A few different drive options will appear. Making sure the BOOTCAMP partition is highlighted click the Formatlink.

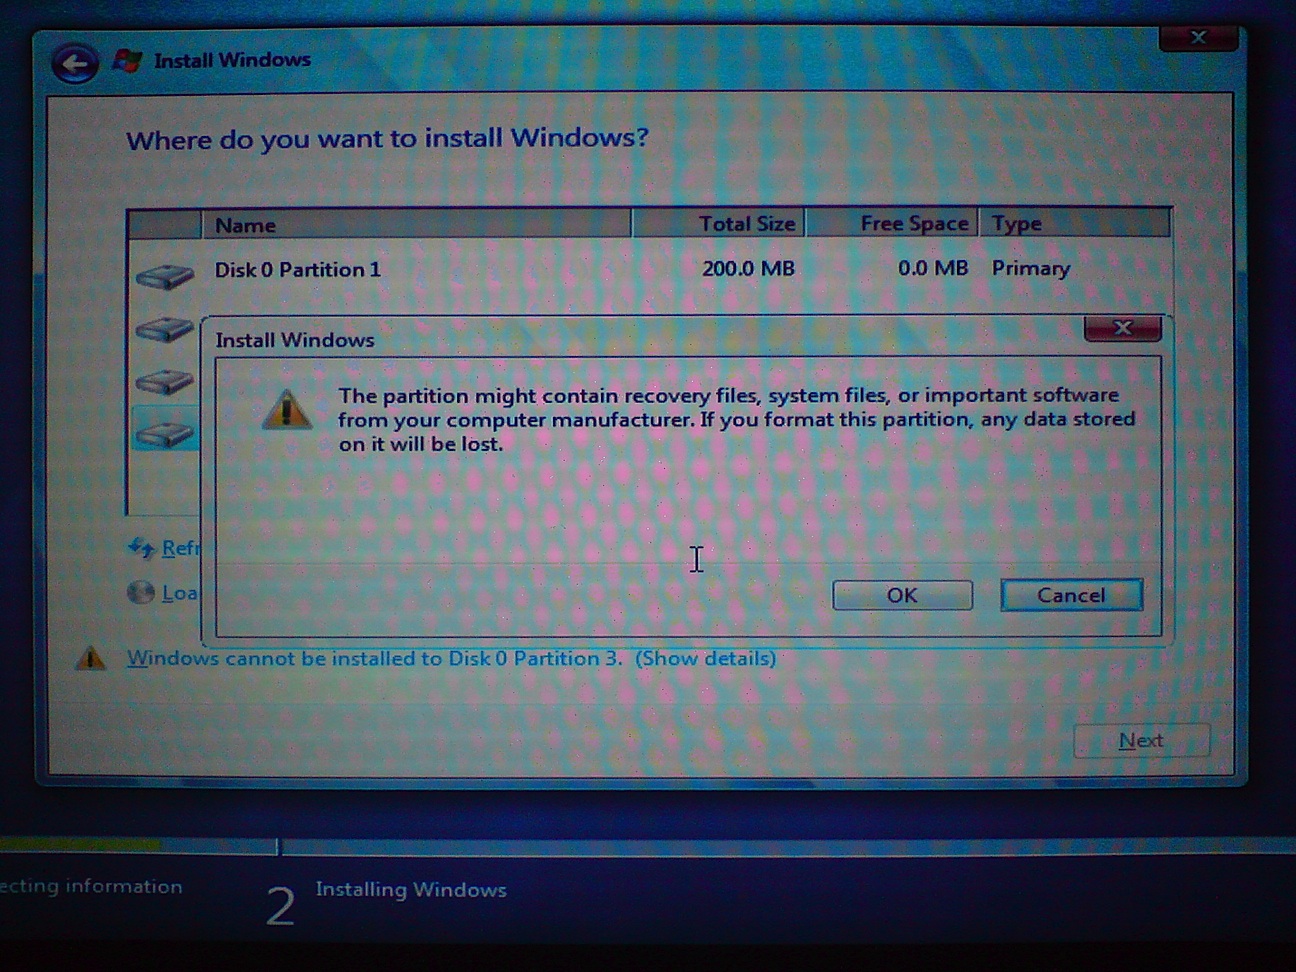
A popup window will appear warning you that any data stored on the partition will be lost. Click the OK button.

Once the drive has finished formatting you can click the Next button to continue.

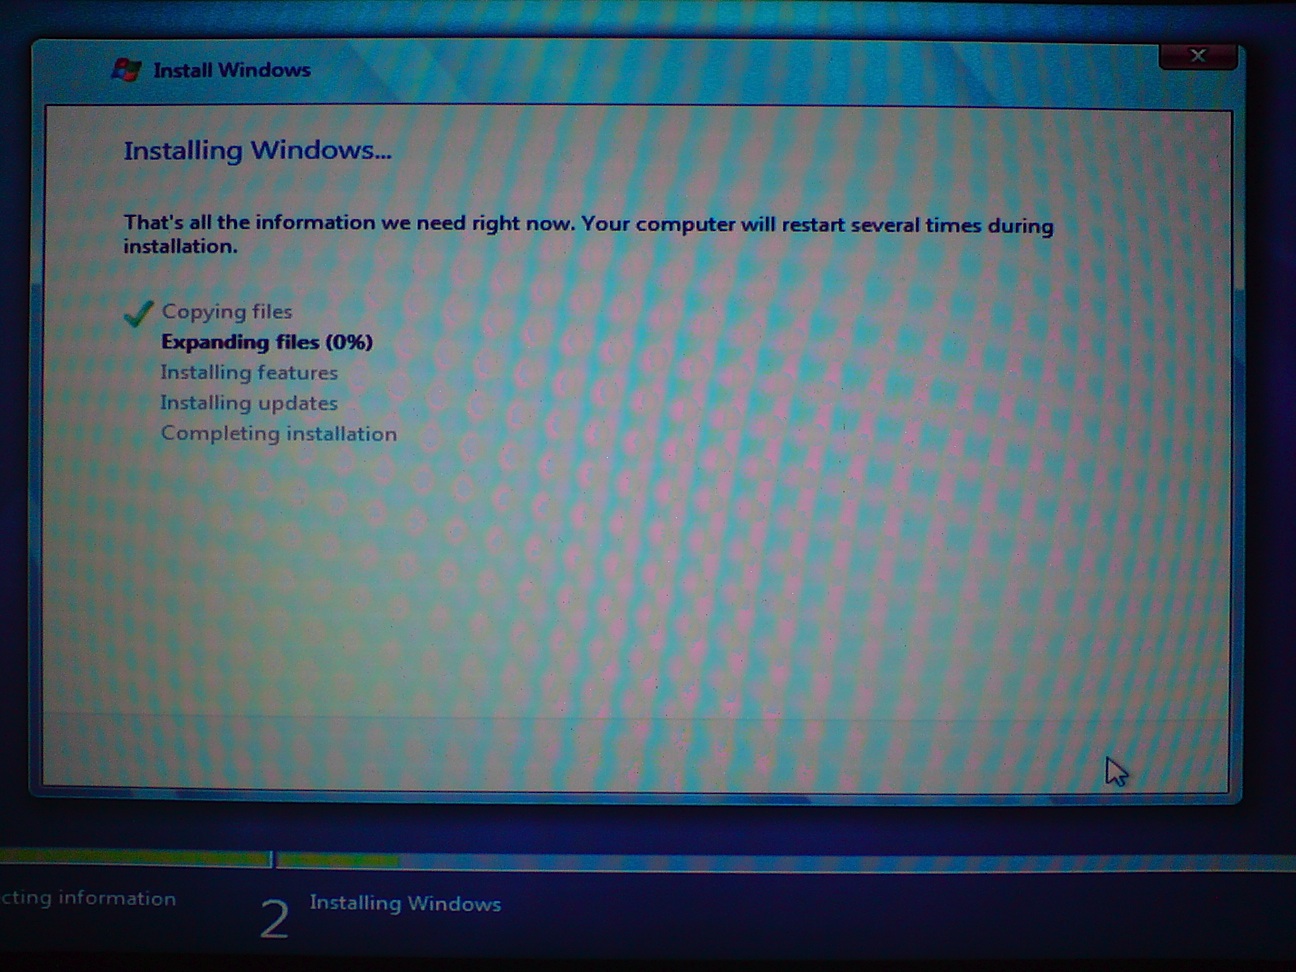
Step Thirteen
Windows 7 will now begin copying and expanding files. This may take some time. After all the files have been copied and expanded your computer will reboot.


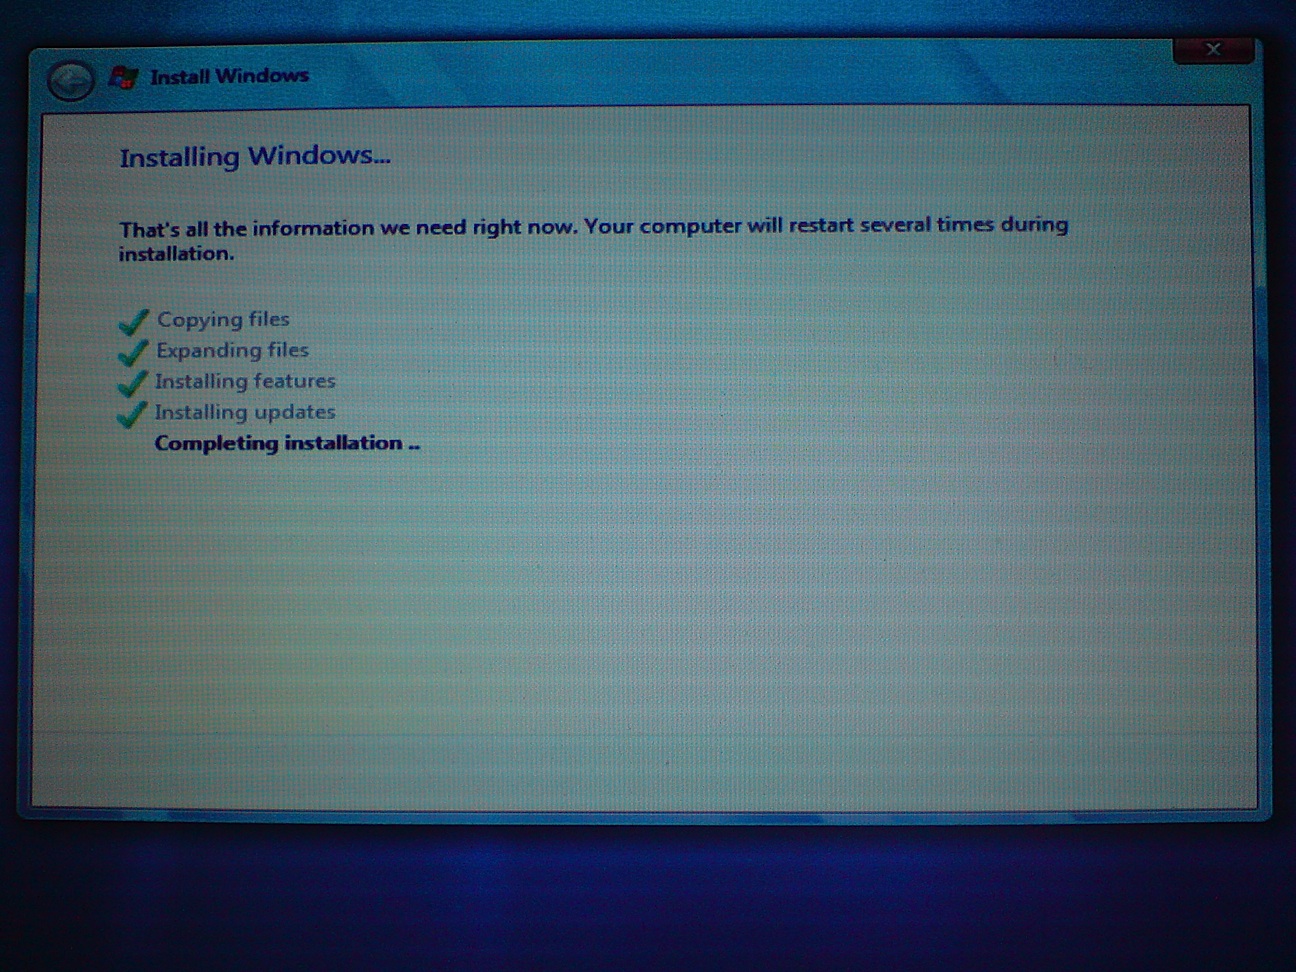
Windows 7 will now complete the installation.

Your computer will then be restarted again.

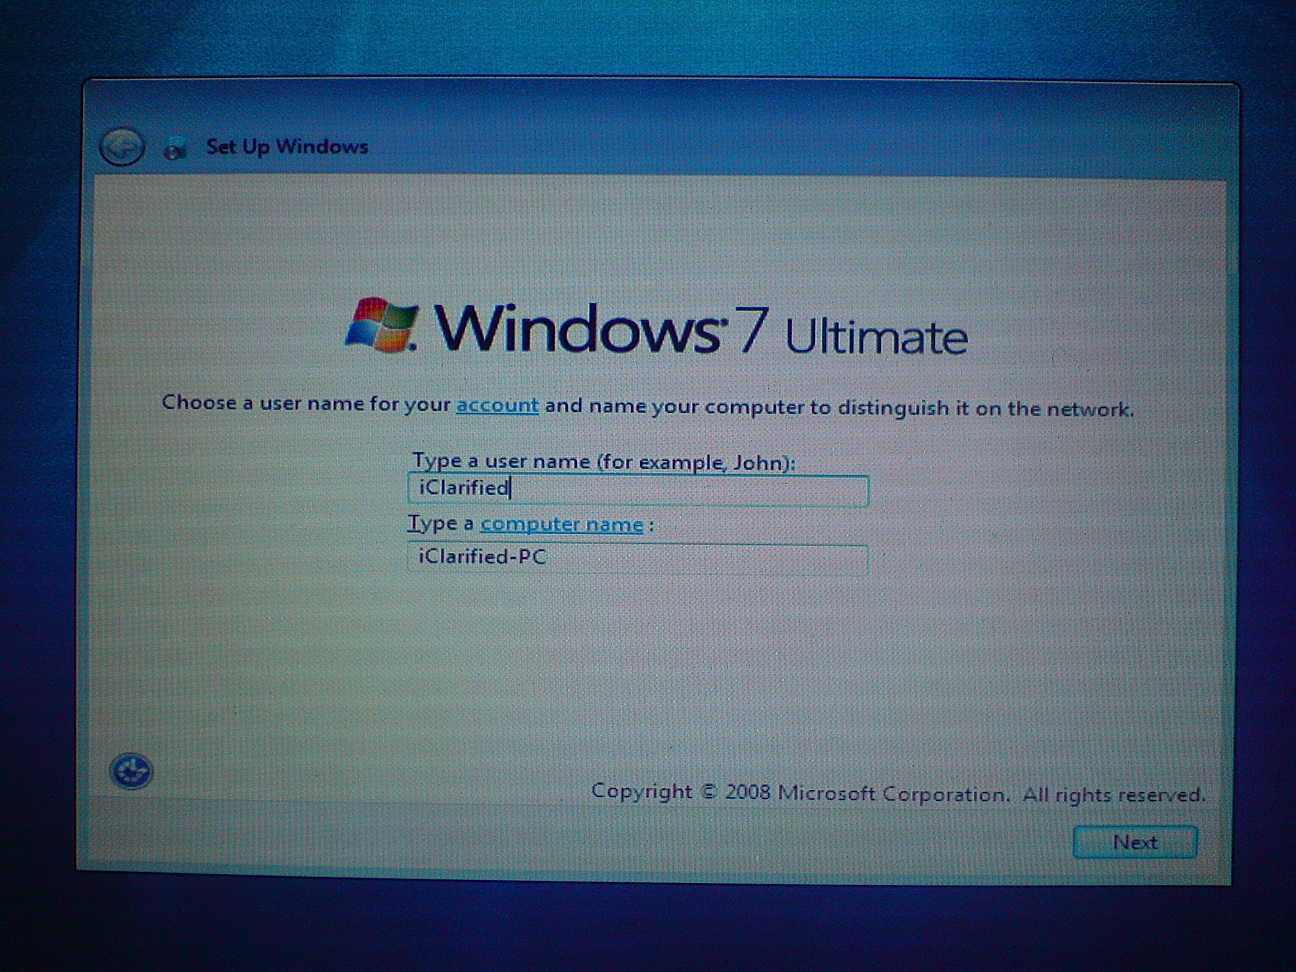
Step Fourteen
You will then be asked to choose a username for your account and name your computer to distinguish it on the network. Please do this then click the Next button to continue.

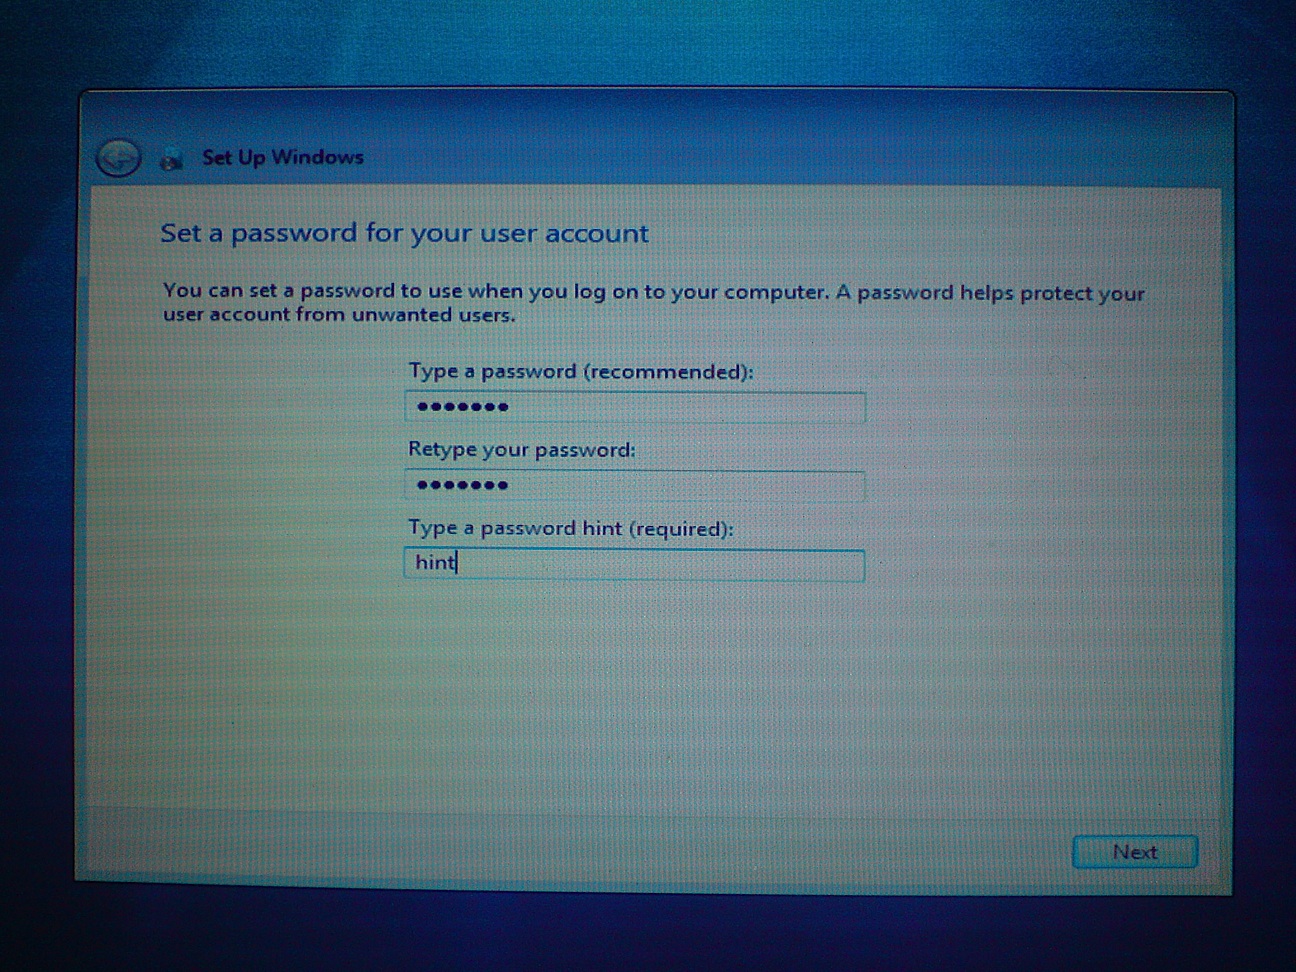
Step Fifteen
You will then be asked to set a password to use when you log on to your computer. Type in your desired password, retype it to confirm, and enter a hint to be used if you forget the password. Click the Next button to continue.

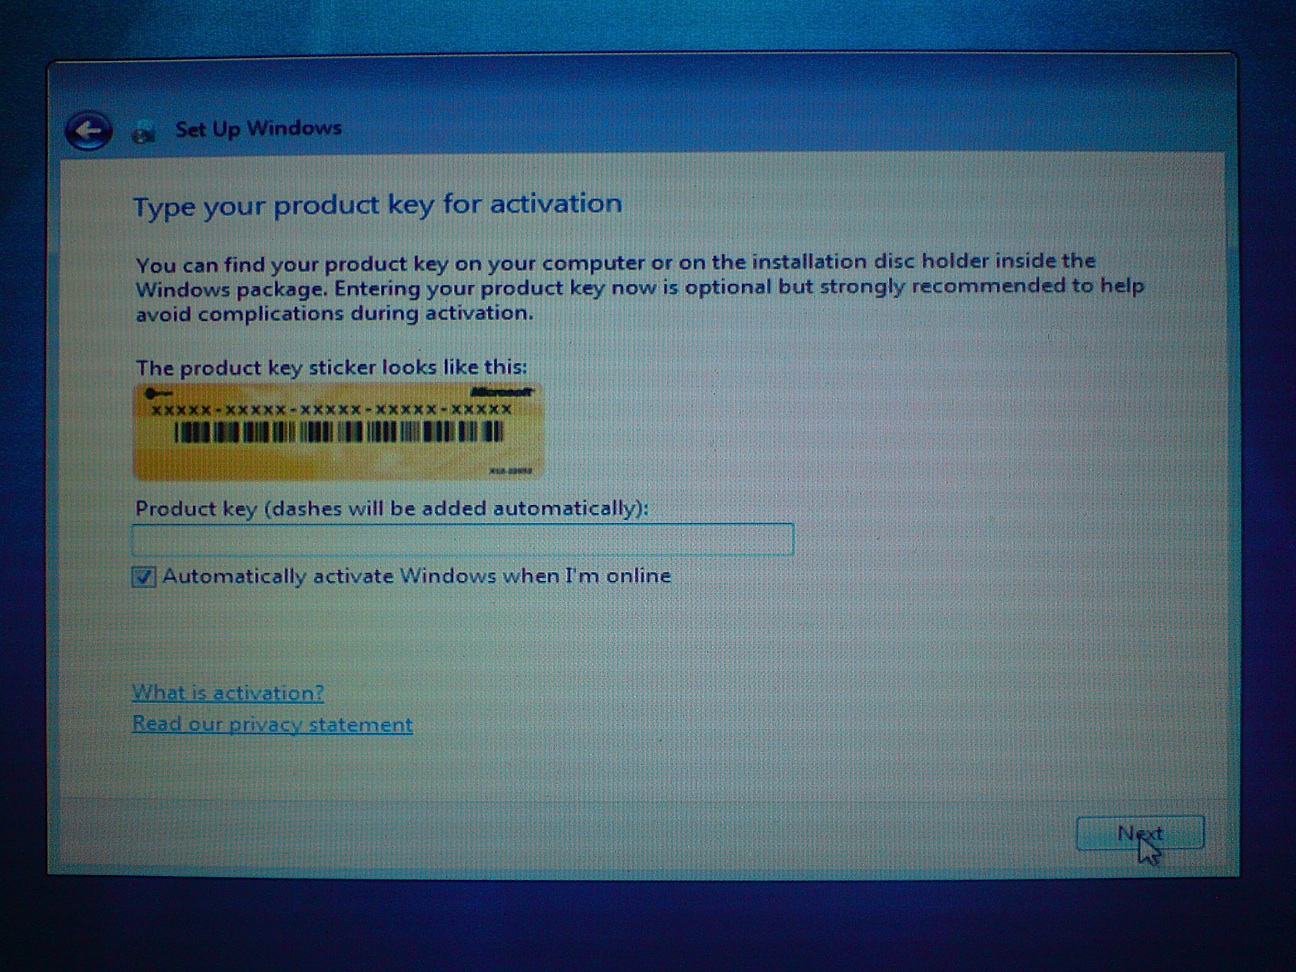
Step Sixteen
Windows 7 Setup will now ask for your product key. Input the key then click the Next button to continue.

Step Eighteen
Windows will now ask you to select your preference in regards to its updates, security, and online assistance. Select Use recommended settings unless you are an advanced user and understand how to manage the system on your own.

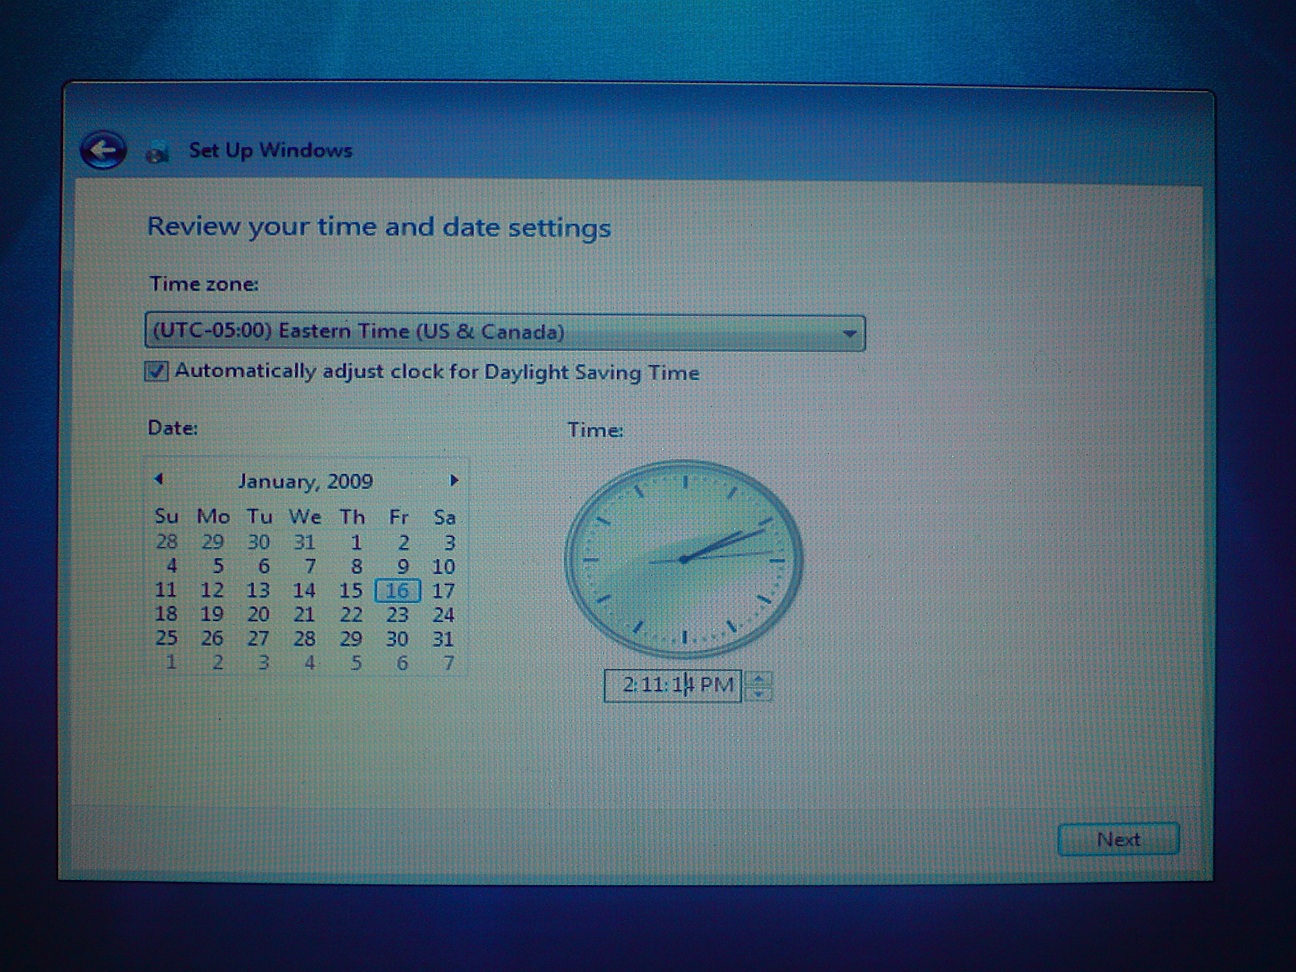
Step Nineteen
Review your time and date settings to make sure they are correct, then click the Next button to continue.

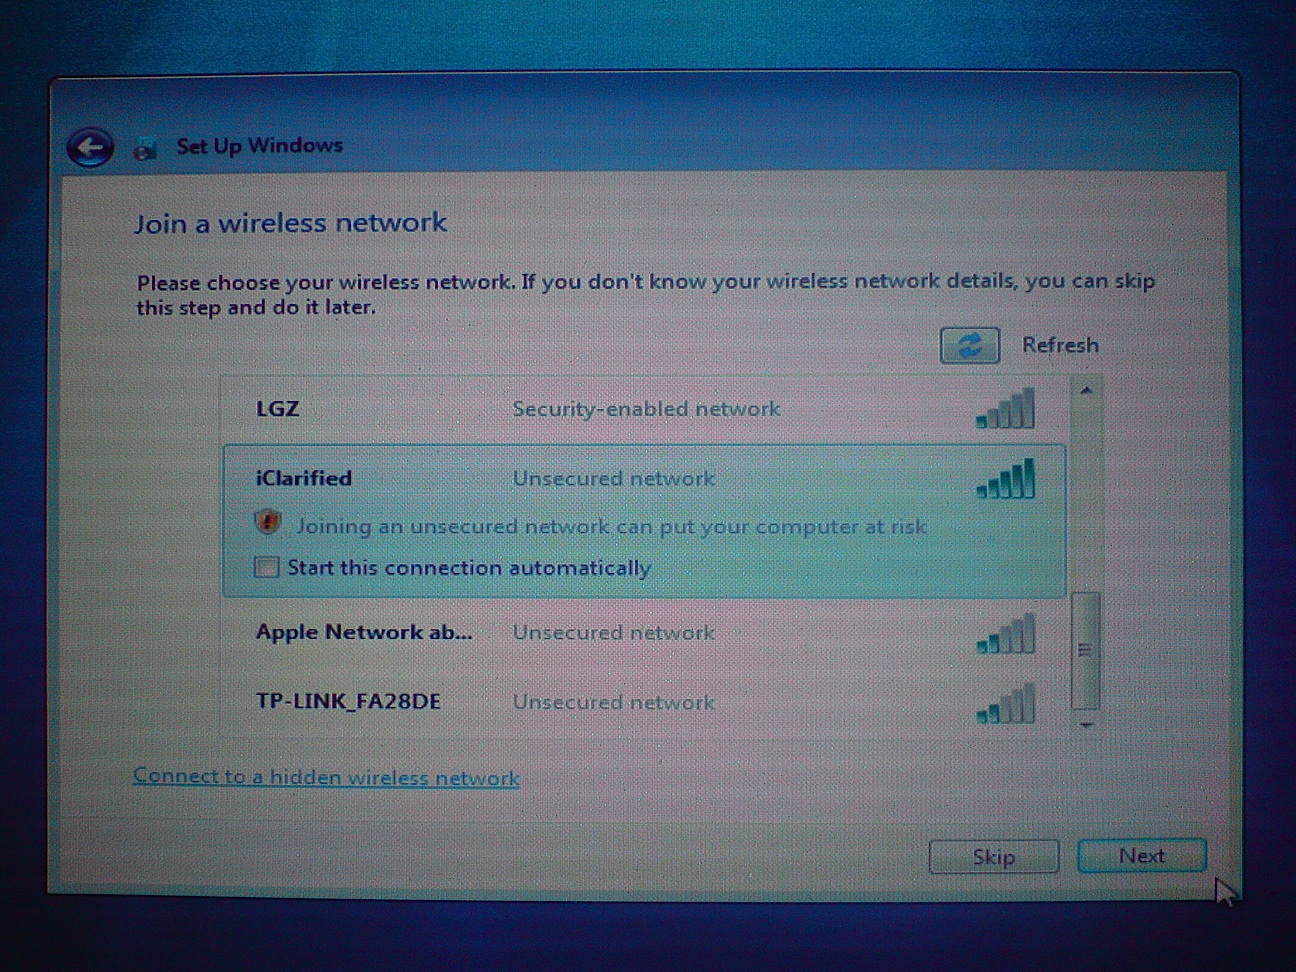
Step Twenty
You will be asked to join a wireless network. Select your wireless network from the list that appears then click theNext button. If you do not wish to set up a wireless network you may click the Skip button.

Step Twenty One
Windows 7 Setup will ask you to select your computer's current location. Click the appropriate option.

Step Twenty Two
Since I select Home in the previous step, Windows asks if I would like to create a homegroup. A homegroup links computers on your home network so that you can share devices and files. Click the Next button if you would like to create a homegroup; otherwise, click the Skip button.

Step Twenty Three
Windows 7 will now open to the Desktop.

Click on the Windows button at the bottom left then click Computer. Select your DVD drive from the visible devices then click the Eject button in the toolbar.

Step Twenty Four
Insert your Mac OS X Installation DVD and run the setup.exe file.

Note*: If you have installed the 64 bit version of Windows 7 then insert and run a DVD that contains BootCamp 2.1 for Windows Vista 64 bit (BCUpdateVista64.exe).
Step Twenty Five
The Boot Camp Installer will appear to guide you through the steps necessary to install Boot Camp. Click theNext button to get started.

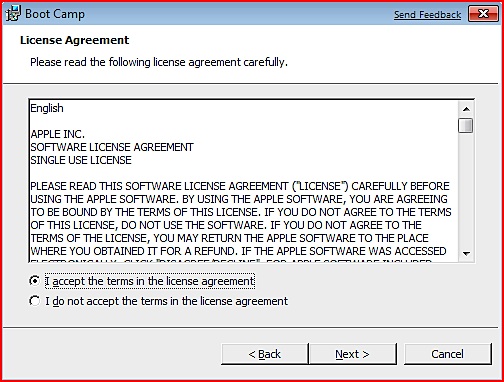
Step Twenty Six
Read the license agreement, select I accept the terms in the license agreement, then click the Next button to continue.

Step Twenty Seven
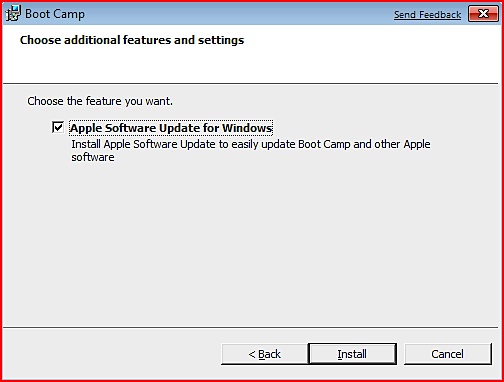
Choose whether you would like to install Apple Software Update for Windows then click the Install button.

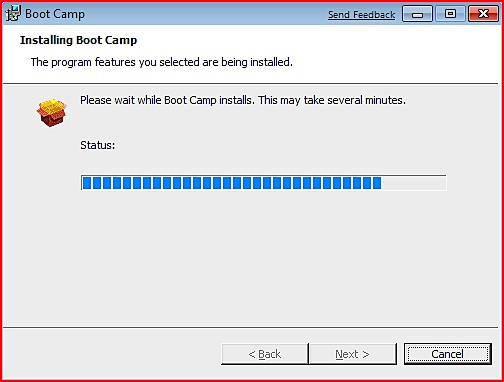
Step Twenty Eight
Boot Camp will proceed to install the drivers necessary for your Mac to work properly with Windows.

When the installation has completed click the Finish button.

You will then be prompted to restart your system for the configuration changes to take effect. Click the Yesbutton.

Step Twenty Nine
Once your system has restarted you will have successfully installed Windows 7 on your Mac using Boot Camp.
Notice that now your screen resolution will have improved and you should have all your drivers working properly!

NOTES*: We installed Windows 7 on a late 2008 MacBook Pro. We had no difficulties with drivers of any sort. If there are any specific models of Macs that do need additional drivers please let us know in the comments and we will update the notes to contain links to these drivers. Thanks.
Before you begin this tutorial you will need the following:
- Windows 7 Installation DVD
- Mac OS X Installation DVD or Boot Camp 2.1 on CD/DVD
Step One
Open a new Finder window by clicking the Finder icon in your dock.
Step Two
Click Applications from the list of places on the left.
Step Three
Double click the Utilities folder to access your utility applications.
Step Four
Double click the Boot Camp icon to launch the application.
Step Five
The Boot Camp Assistant will open. Click the Continue button.
Step Six
You will now be asked to Create a Partition for Windows. You can drag the divider to set the size of the partitions. Windows 7 needs about 10 GB at very minimum. If you plan to install applications make sure you allow extra space for them. I clicked the Use 32 GB button to assign 32 GB to my Windows 7 partition. When satisfied with the size of your partition click the Partition button.
Boot Camp will now partition your hard disk...
Step Seven
Once your disk has been partitioned you are ready to start the Windows installation. Insert your Windows 7 Installation DVD and click the Start Installation button.
Step Eight
Your computer will now reboot and launch the Windows 7 Setup. Select your language, Time and currency format, and Keyboard or input method from the dropdown boxes, then click the Next button.
Step Nine
Click the Install now button.
Step Ten
Please read the license terms then check the box to accept the license terms. Click the Next button to continue.
Step Eleven
Click to select the Custom (advanced) method of installation.
Step Twelve
Click to select the Disk Partition labeled BOOTCAMP then click the Drive options (advanced) link below.
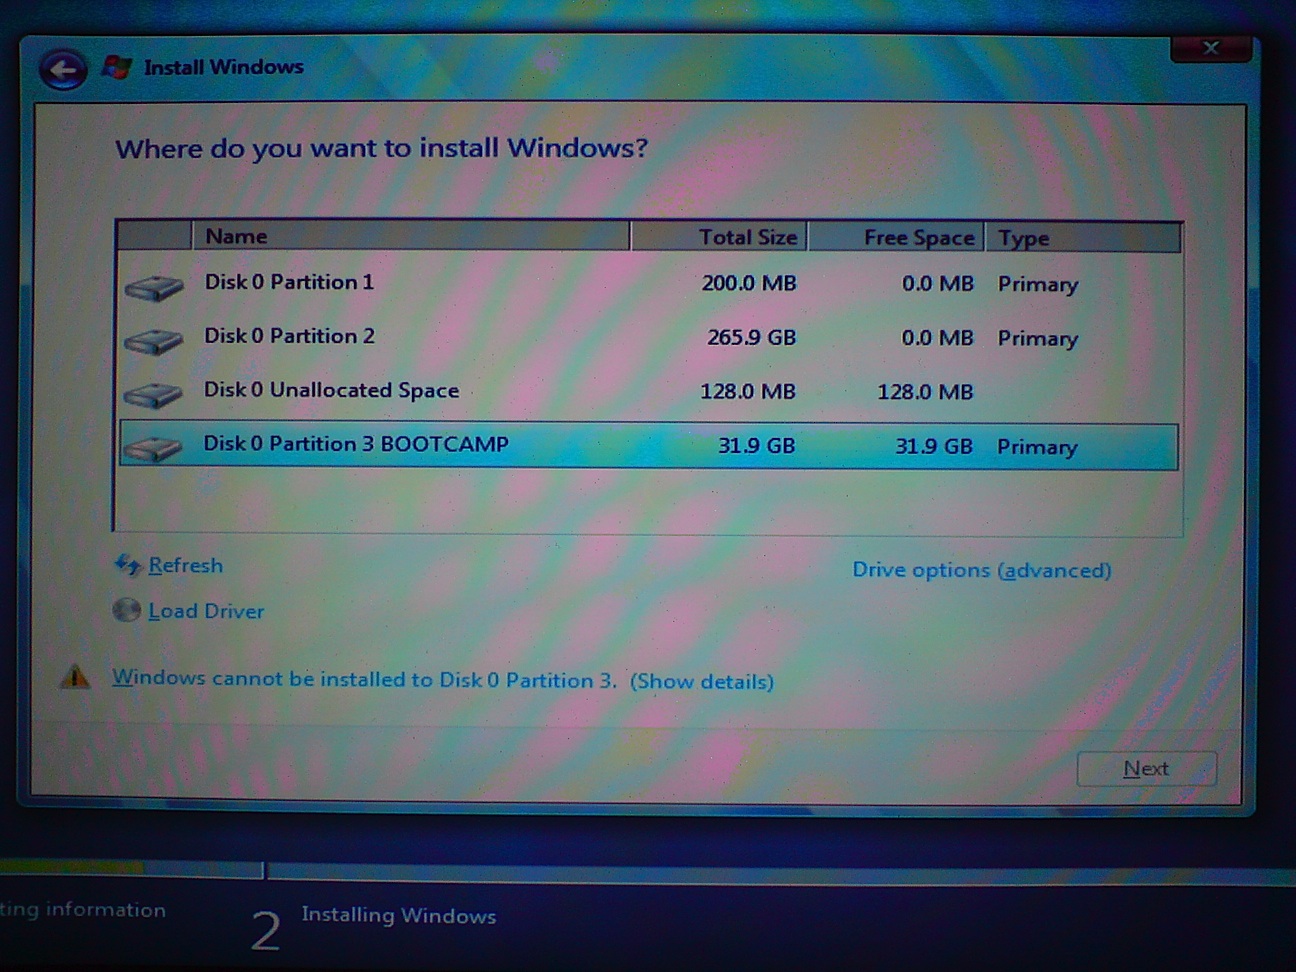
A few different drive options will appear. Making sure the BOOTCAMP partition is highlighted click the Formatlink.

A popup window will appear warning you that any data stored on the partition will be lost. Click the OK button.
Once the drive has finished formatting you can click the Next button to continue.
Step Thirteen
Windows 7 will now begin copying and expanding files. This may take some time. After all the files have been copied and expanded your computer will reboot.
Windows 7 will now complete the installation.
Your computer will then be restarted again.

Step Fourteen
You will then be asked to choose a username for your account and name your computer to distinguish it on the network. Please do this then click the Next button to continue.
Step Fifteen
You will then be asked to set a password to use when you log on to your computer. Type in your desired password, retype it to confirm, and enter a hint to be used if you forget the password. Click the Next button to continue.
Step Sixteen
Windows 7 Setup will now ask for your product key. Input the key then click the Next button to continue.
Step Eighteen
Windows will now ask you to select your preference in regards to its updates, security, and online assistance. Select Use recommended settings unless you are an advanced user and understand how to manage the system on your own.

Step Nineteen
Review your time and date settings to make sure they are correct, then click the Next button to continue.
Step Twenty
You will be asked to join a wireless network. Select your wireless network from the list that appears then click theNext button. If you do not wish to set up a wireless network you may click the Skip button.
Step Twenty One
Windows 7 Setup will ask you to select your computer's current location. Click the appropriate option.
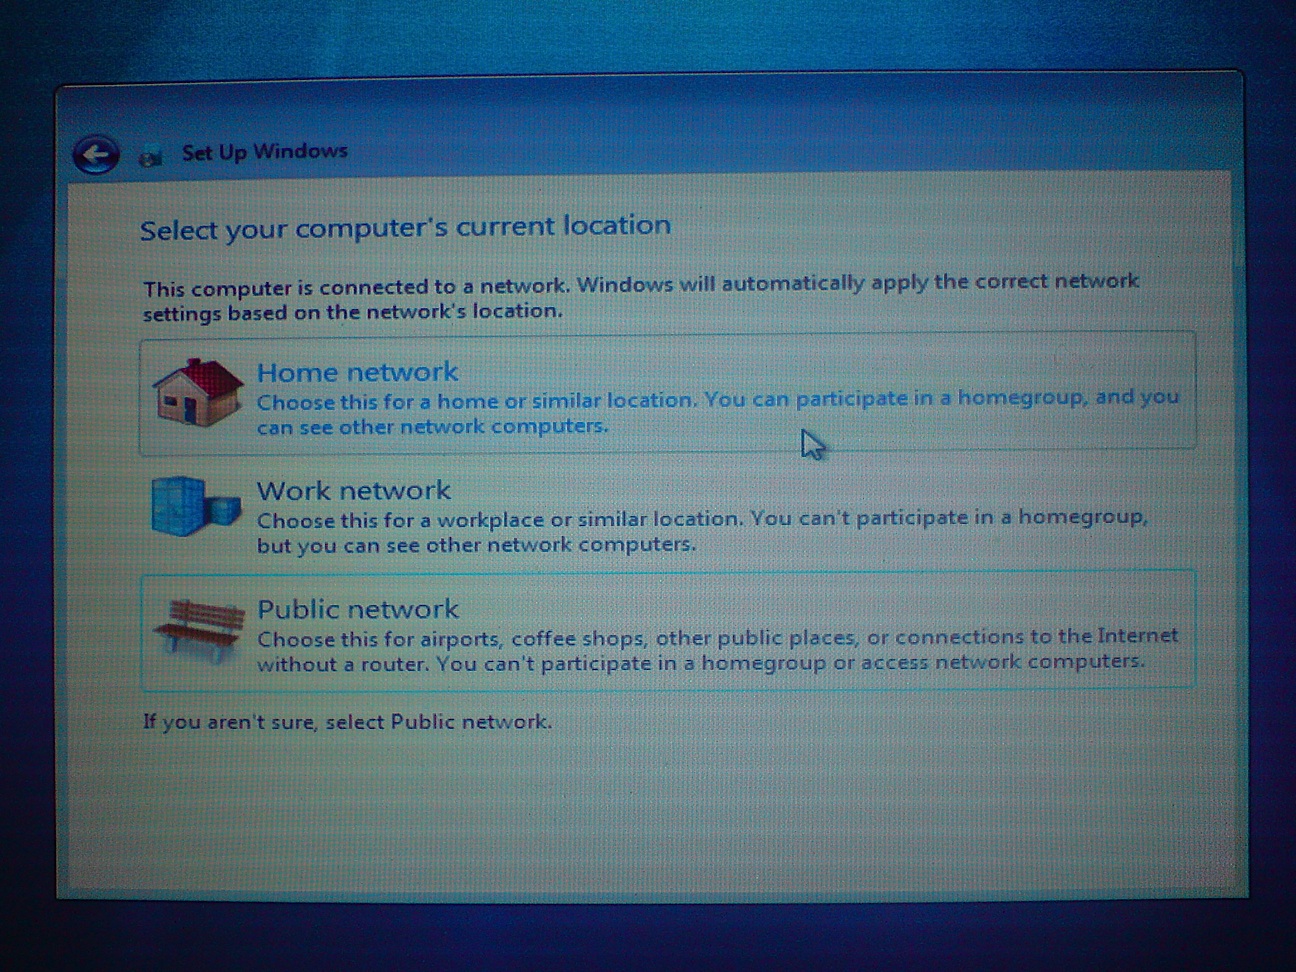
Step Twenty Two
Since I select Home in the previous step, Windows asks if I would like to create a homegroup. A homegroup links computers on your home network so that you can share devices and files. Click the Next button if you would like to create a homegroup; otherwise, click the Skip button.

Step Twenty Three
Windows 7 will now open to the Desktop.
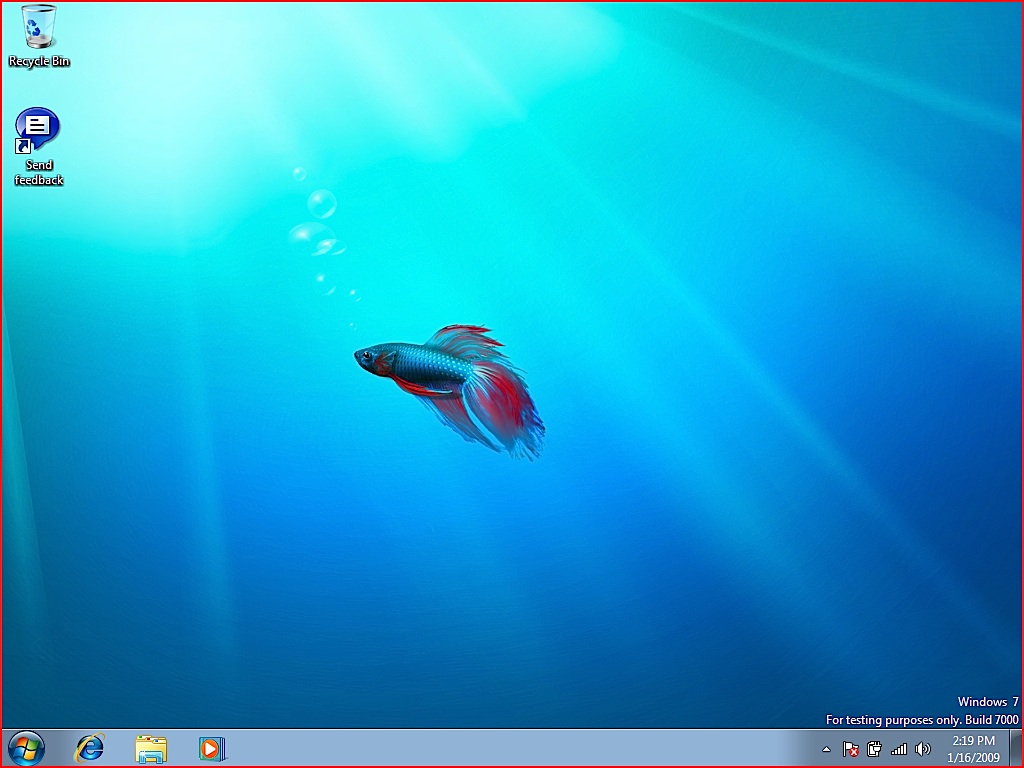
Click on the Windows button at the bottom left then click Computer. Select your DVD drive from the visible devices then click the Eject button in the toolbar.
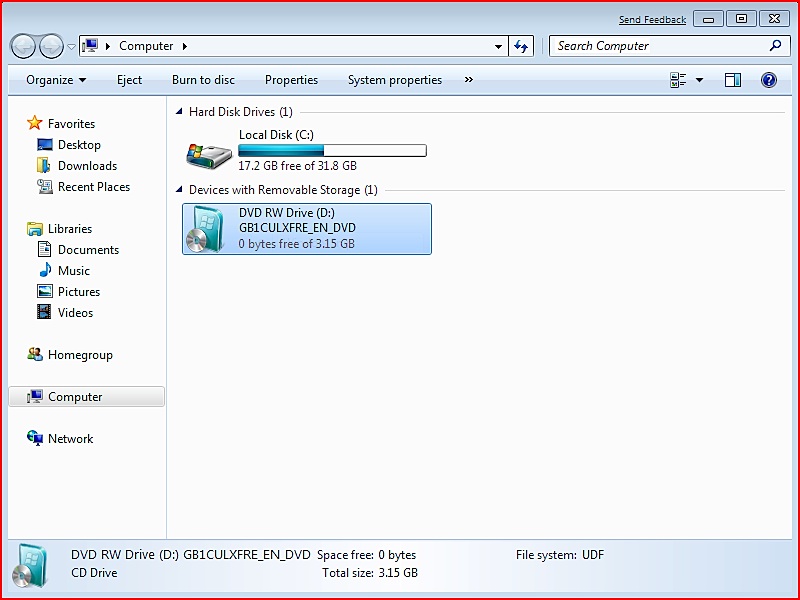
Step Twenty Four
Insert your Mac OS X Installation DVD and run the setup.exe file.
Note*: If you have installed the 64 bit version of Windows 7 then insert and run a DVD that contains BootCamp 2.1 for Windows Vista 64 bit (BCUpdateVista64.exe).
Step Twenty Five
The Boot Camp Installer will appear to guide you through the steps necessary to install Boot Camp. Click theNext button to get started.

Step Twenty Six
Read the license agreement, select I accept the terms in the license agreement, then click the Next button to continue.
Step Twenty Seven
Choose whether you would like to install Apple Software Update for Windows then click the Install button.
Step Twenty Eight
Boot Camp will proceed to install the drivers necessary for your Mac to work properly with Windows.
When the installation has completed click the Finish button.
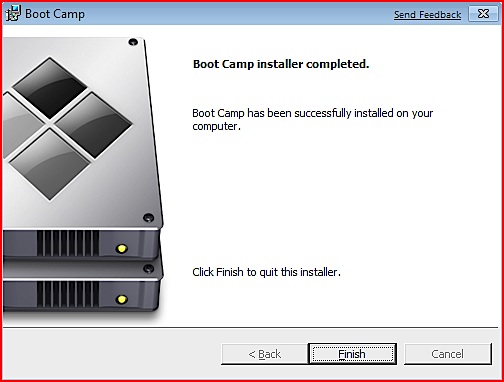
You will then be prompted to restart your system for the configuration changes to take effect. Click the Yesbutton.
Step Twenty Nine
Once your system has restarted you will have successfully installed Windows 7 on your Mac using Boot Camp.
Notice that now your screen resolution will have improved and you should have all your drivers working properly!

NOTES*: We installed Windows 7 on a late 2008 MacBook Pro. We had no difficulties with drivers of any sort. If there are any specific models of Macs that do need additional drivers please let us know in the comments and we will update the notes to contain links to these drivers. Thanks.
Subscribe to:
Posts (Atom)